普通视图

Received before yesterday

苹果Carplay 自定义壁纸实现逻辑分析

2025年6月1日 16:02

虽然在开车的时候,多数时间不会停留在carplay的桌面。然而,当第一次切进来的时候显示的那个桌面背景图片,着实不怎么喜欢。于是就想着能够换掉这个壁纸。

网上搜了一下,基本都是一年前的文章,或者说最新的文章都是一年前的。这就比较尴尬了。
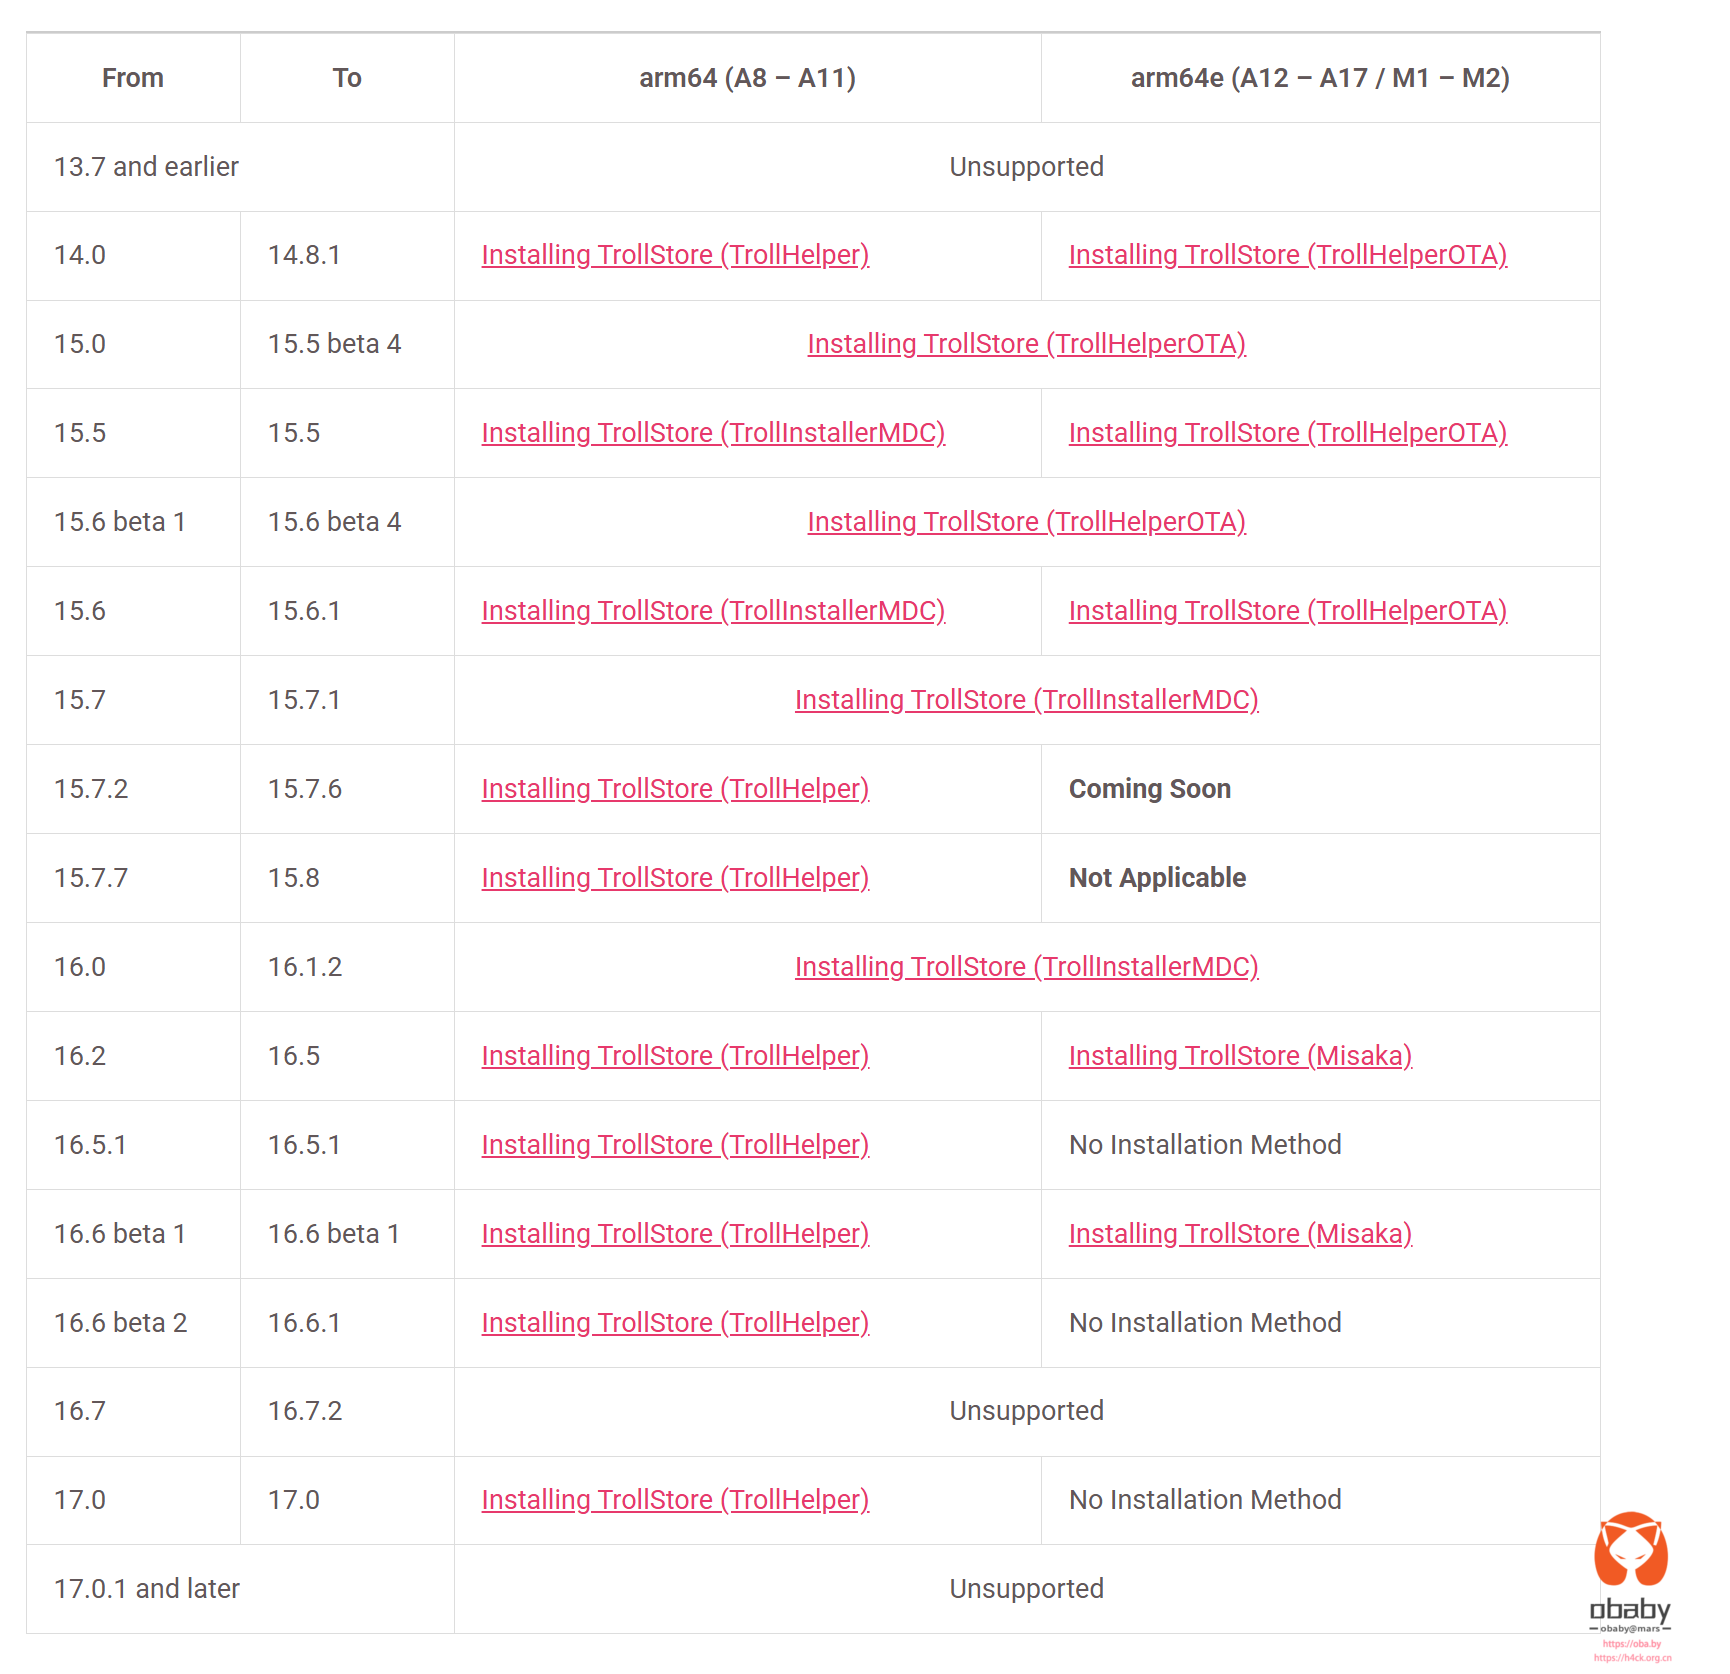
而至于实现工具和方法,到处都是抄来抄去的文章,第一步基本都是安装巨魔助手,Troll app,https://trollstore.app
这是一个越狱的应用商店。通过这个越狱的商店安装AirWall,在air wall里面设置壁纸。
https://onejailbreak.com/blog/airwall/


这一切看起来似乎完美,但是,这个troll store app 最高支持到ios 17,我现在的18没有越狱,也不想越狱。那么又该怎么搞呢?


自然是自签名,目前爱思助手之类的貌似不支持普通的appstore账号签名安装了。
不过可以通过下面的工具,签名应用然后通过爱思助手安装。

Sideloadly Download iOS 18.3+ | Install IPA Without Revoke

Esign iPA download and install using Sideloaly App.
Download Esign IPA:
First, download the Esign IPA file for your PC.
Download Esign iPA file.
Install Sideloadly:
Sideloadly is the tool we’ll use to install Esign on your iOS device.
If you don’t have Sideloadly yet, download and install Sideloadly app on your PC(Windows or Mac).
Connect Your Device:
Connect your iPhone or iPad to your computer using a USB cable.
Open Sideloadly:
Launch the Sideloadly application on your computer.
Select the IPA File:
In Sideloadly, click on the IPA icon to select the Esign IPA file you downloaded earlier.
Sign the IPA File:
Enter your Apple ID and password when prompted. This step is necessary for signing the IPA file.
Start Installation:
Click the Start button in Sideloadly to begin the installation process.
Sideloadly will sign the Esign IPA file and install it on your iOS device.
Check Your Home Screen:
Once the process is complete, you’ll find the Esign app icon on your home screen.
Then go to Settings App → General → Profiles & Device Management → Find the Esign app profile and trust it.
You can now use Esign to sign and install other IPA files directly on your device.

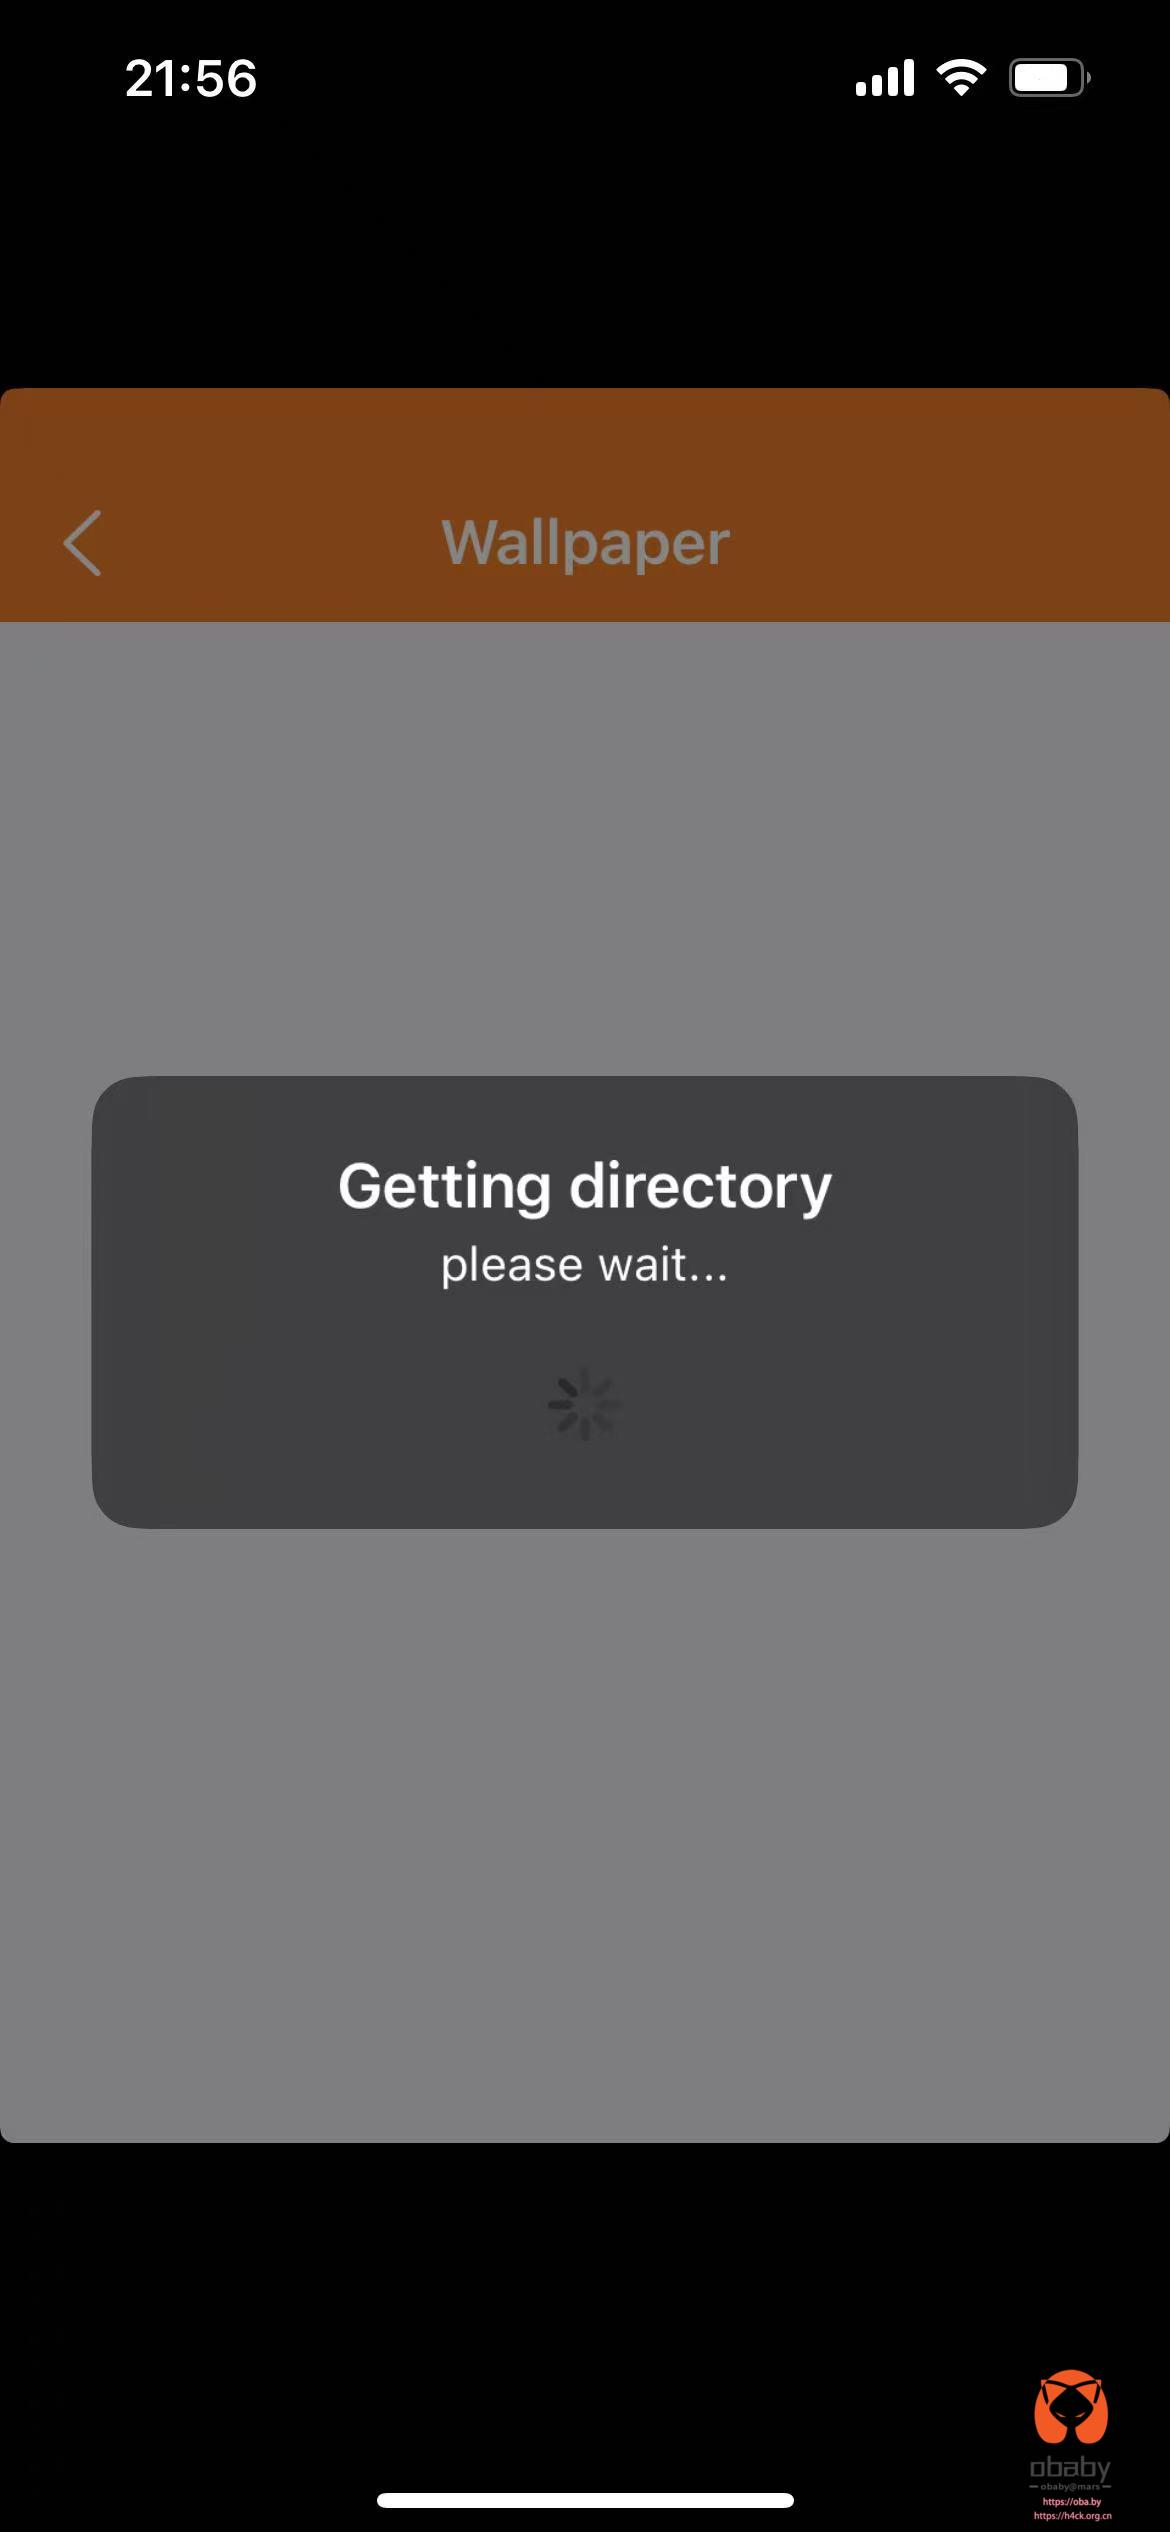
然而,签名安装之后却发现了另外一个问题,那就是卡在了加载界面。一直在获取目录,后面就进行不下去了。

上网搜了一下,好无进展,都是说什么连接carplay之后在设置,然而,这就是句废话。连上了也没什么用。
不过,这个app体积不大,直接拉出来。扔到hopper里面看下实现逻辑,也并不复杂。
直接通过目录来获取的当前壁纸,同样替换壁纸也是直接写入文件实现的。
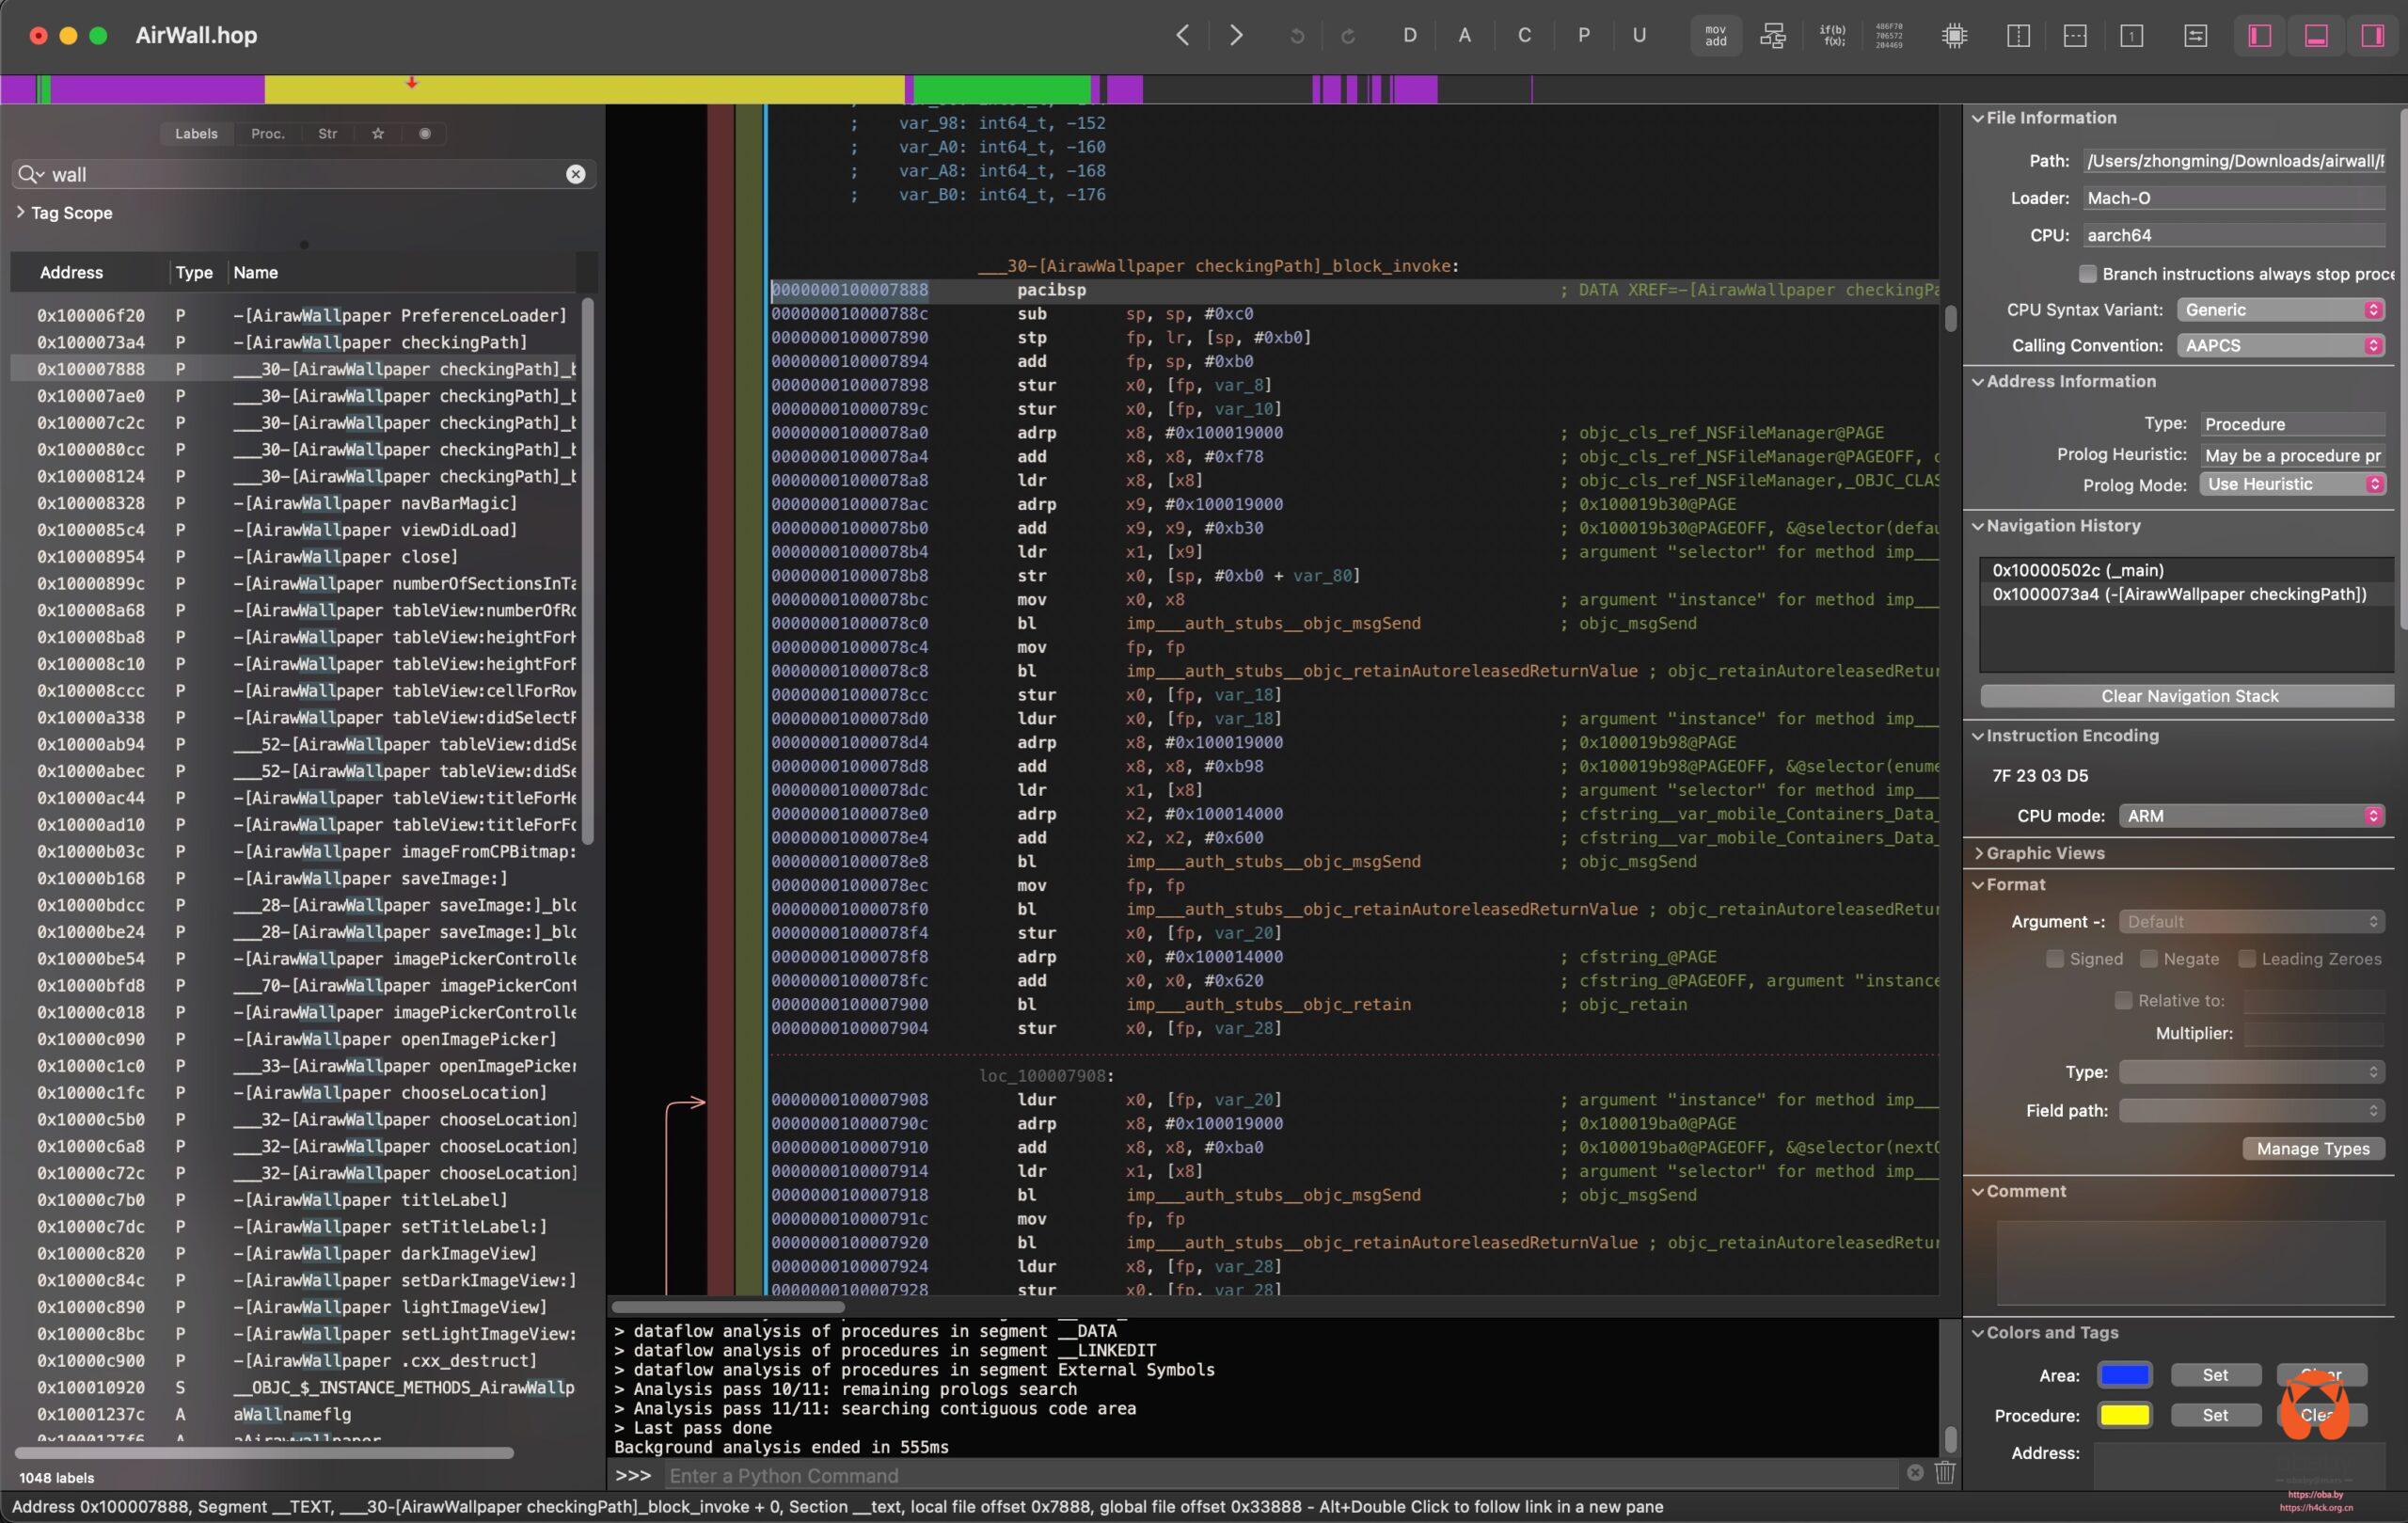
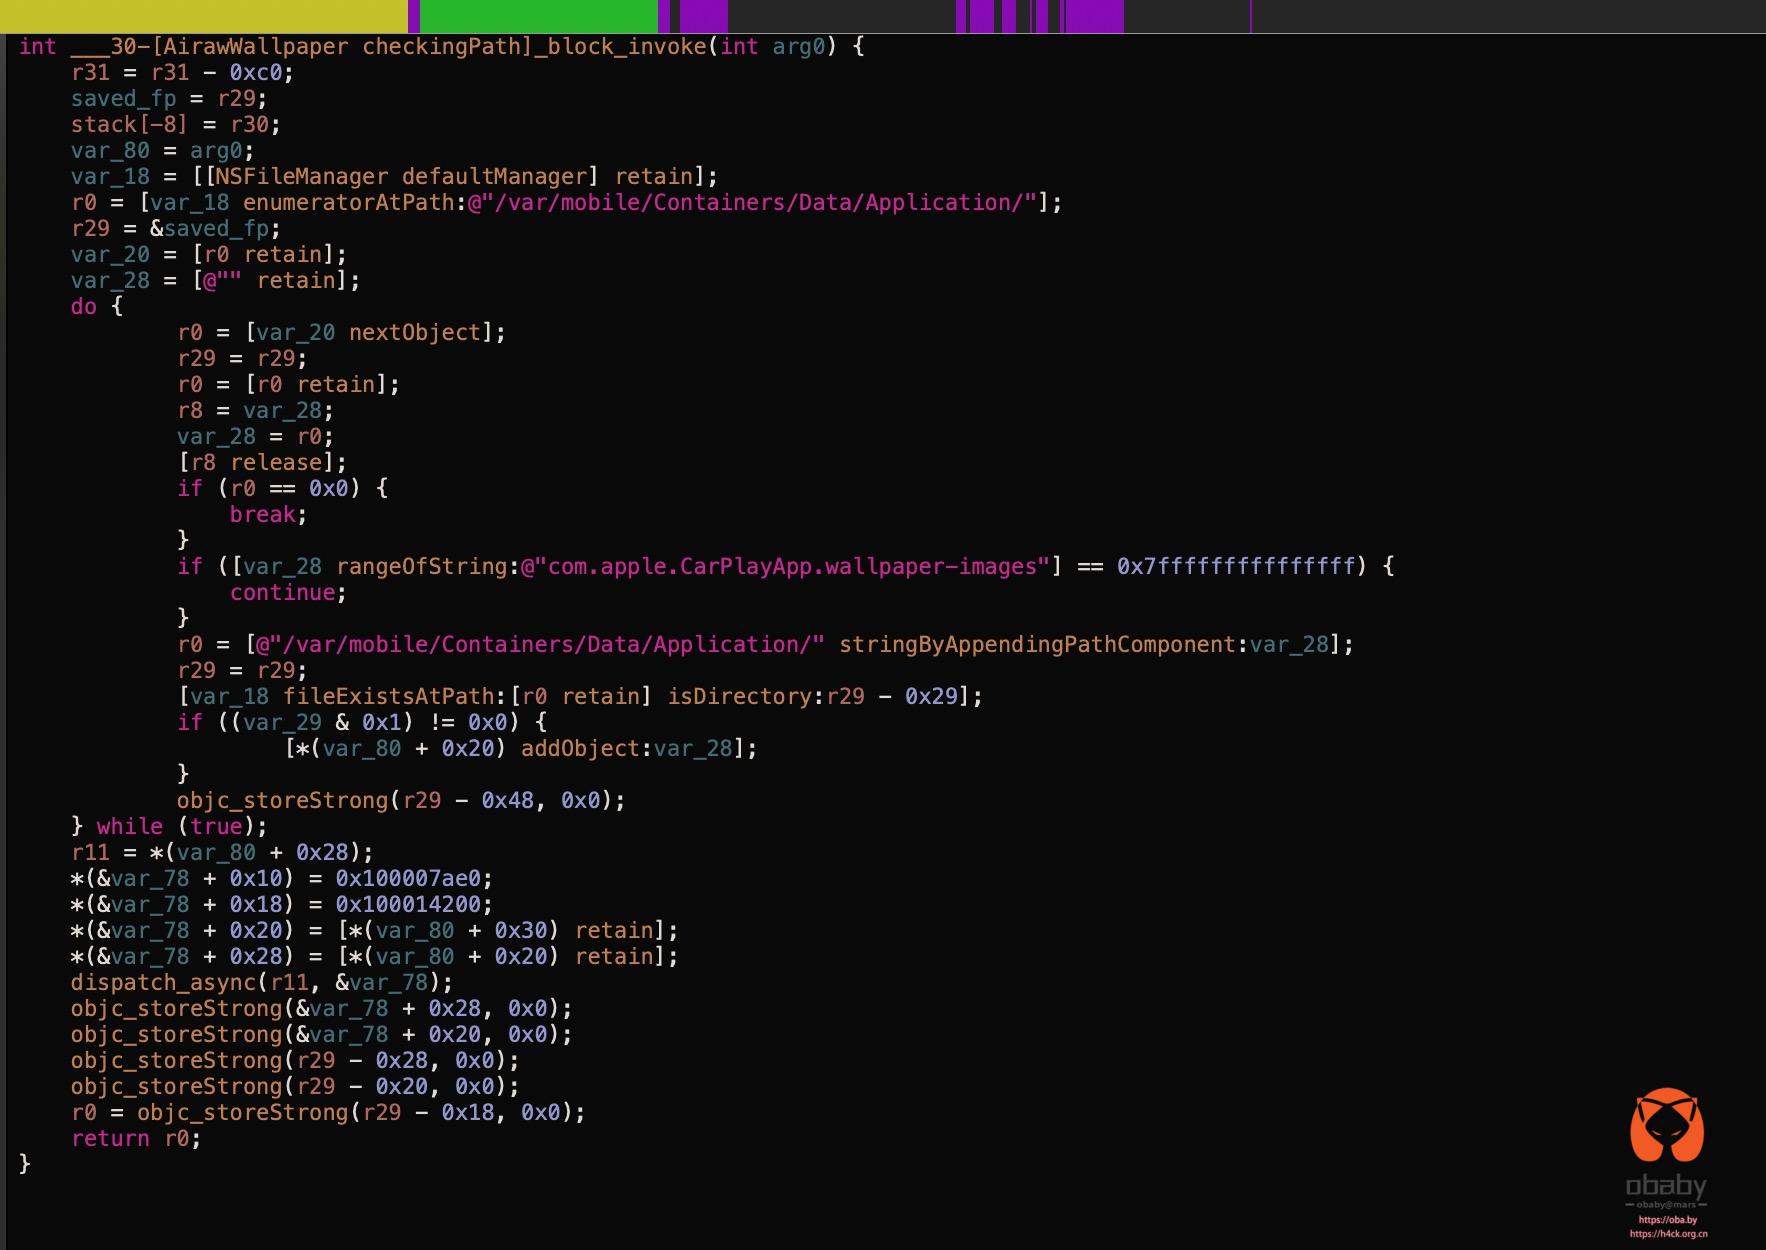

看F5之后的代码就更直观了。


导出代码,直接扔给cursor,让cursor根据f5代码拆分重构代码。

现在代码逻辑就明朗了,更换壁纸的方法主要在AirawWallpaper.m中:

#pragma mark - Helper Methods

- (void)checkingPath {
    // 检查壁纸路径
    NSFileManager *fileManager = [NSFileManager defaultManager];
    NSString *basePath = @"/var/mobile/Containers/Data/Application/";
    
    // 检查是否有权限访问
    if (![fileManager isWritableFileAtPath:basePath]) {
        UIAlertController *alert = [UIAlertController alertControllerWithTitle:@"权限错误"
                                                                      message:@"无法访问系统目录,请确保设备已越狱并授予了正确的权限。"
                                                               preferredStyle:UIAlertControllerStyleAlert];
        [alert addAction:[UIAlertAction actionWithTitle:@"确定" style:UIAlertActionStyleDefault handler:nil]];
        [self presentViewController:alert animated:YES completion:nil];
        return;
    }
    
    NSError *error = nil;
    NSArray *contents = [fileManager contentsOfDirectoryAtPath:basePath error:&error];
    if (error) {
        NSLog(@"Error reading directory: %@", error);
        return;
    }
    
    NSMutableArray *validPaths = [NSMutableArray array];
    for (NSString *path in contents) {
        if ([path containsString:@"com.apple.CarPlayApp.wallpaper-images"]) {
            NSString *fullPath = [basePath stringByAppendingPathComponent:path];
            BOOL isDirectory;
            if ([fileManager fileExistsAtPath:fullPath isDirectory:&isDirectory] && isDirectory) {
                [validPaths addObject:path];
            }
        }
    }
    
    if (validPaths.count > 0) {
        self.FullCache = [basePath stringByAppendingPathComponent:validPaths[0]];
        [self.tableView reloadData];
    } else {
        UIAlertController *alert = [UIAlertController alertControllerWithTitle:@"错误"
                                                                      message:@"未找到 CarPlay 壁纸目录,请确保已正确安装 CarPlay 应用。"
                                                               preferredStyle:UIAlertControllerStyleAlert];
        [alert addAction:[UIAlertAction actionWithTitle:@"确定" style:UIAlertActionStyleDefault handler:nil]];
        [self presentViewController:alert animated:YES completion:nil];
    }
}

当然,上面这段代码的错误提示是我让cursor加上的。原来的并没有这段,这个是f5的代码:

int ___30-[AirawWallpaper checkingPath]_block_invoke(int arg0) {
    r31 = r31 - 0xc0;
    saved_fp = r29;
    stack[-8] = r30;
    var_80 = arg0;
    var_18 = [[NSFileManager defaultManager] retain];
    r0 = [var_18 enumeratorAtPath:@"/var/mobile/Containers/Data/Application/"];
    r29 = &saved_fp;
    var_20 = [r0 retain];
    var_28 = [@"" retain];
    do {
            r0 = [var_20 nextObject];
            r29 = r29;
            r0 = [r0 retain];
            r8 = var_28;
            var_28 = r0;
            [r8 release];
            if (r0 == 0x0) {
                break;
            }
            if ([var_28 rangeOfString:@"com.apple.CarPlayApp.wallpaper-images"] == 0x7fffffffffffffff) {
                continue;
            }
            r0 = [@"/var/mobile/Containers/Data/Application/" stringByAppendingPathComponent:var_28];
            r29 = r29;
            [var_18 fileExistsAtPath:[r0 retain] isDirectory:r29 - 0x29];
            if ((var_29 & 0x1) != 0x0) {
                    [*(var_80 + 0x20) addObject:var_28];
            }
            objc_storeStrong(r29 - 0x48, 0x0);
    } while (true);
    r11 = *(var_80 + 0x28);
    *(&var_78 + 0x10) = 0x100007ae0;
    *(&var_78 + 0x18) = 0x100014200;
    *(&var_78 + 0x20) = [*(var_80 + 0x30) retain];
    *(&var_78 + 0x28) = [*(var_80 + 0x20) retain];
    dispatch_async(r11, &var_78);
    objc_storeStrong(&var_78 + 0x28, 0x0);
    objc_storeStrong(&var_78 + 0x20, 0x0);
    objc_storeStrong(r29 - 0x28, 0x0);
    objc_storeStrong(r29 - 0x20, 0x0);
    r0 = objc_storeStrong(r29 - 0x18, 0x0);
    return r0;
}

不过现在,也能看出问题出在什么地方了。/var/mobile/Containers/Data/Application/这个目录,普通的app是没有足够的全项访问的。需要申请特殊的权限,直接让cursor创建权限申请的Entitlements:

<?xml version="1.0" encoding="UTF-8"?>
<!DOCTYPE plist PUBLIC "-//Apple//DTD PLIST 1.0//EN" "http://www.apple.com/DTDs/PropertyList-1.0.dtd">
<plist version="1.0">
<dict>
    <!-- 基本权限 -->
    <key>application-identifier</key>
    <string>49U329UV5Q.by.oba.airwall</string>
    
    <key>com.apple.developer.team-identifier</key>
    <string>49U329UV5Q</string>
    
    <key>get-task-allow</key>
    <true/>
    
    <key>keychain-access-groups</key>
    <array>
        <string>49U329UV5Q.*</string>
        <string>com.apple.token</string>
    </array>
    
    <!-- 容器访问权限 (私有API) -->
    <key>com.apple.private.security.container-manager</key>
    <true/>
    
    <key>com.apple.private.security.disk-device-access</key>
    <true/>
    
    <key>com.apple.private.security.system-container</key>
    <true/>
    
    <!-- 文件系统完全访问 -->
    <key>com.apple.private.security.no-container</key>
    <true/>
    
    <key>com.apple.private.security.no-sandbox</key>
    <true/>
    
    <!-- TCC绕过权限 -->
    <key>com.apple.private.tcc.allow</key>
    <array>
        <string>kTCCServiceSystemPolicyAllFiles</string>
        <string>kTCCServiceSystemPolicyDesktopFolder</string>
        <string>kTCCServiceSystemPolicyDocumentsFolder</string>
        <string>kTCCServiceSystemPolicyDownloadsFolder</string>
        <string>kTCCServiceAppleEvents</string>
    </array>
    
    <!-- 根权限访问 -->
    <key>com.apple.private.security.storage.SystemPolicyAllFiles</key>
    <true/>
    
    <!-- 平台应用权限 -->
    <key>platform-application</key>
    <true/>
    
    <!-- 跳过验证 -->
    <key>com.apple.private.skip-library-validation</key>
    <true/>
    
    <!-- 任务访问权限 -->
    <key>task_for_pid-allow</key>
    <true/>
    
    <!-- 进程调试权限 -->
    <key>com.apple.system-task-ports</key>
    <true/>
    
    <!-- 网络权限 -->
    <key>com.apple.security.network.client</key>
    <true/>
    <key>com.apple.security.network.server</key>
    <true/>
</dict>
</plist>

既然添加了自定义的权限,那么使用这些签名工具就没办法写入权限文件了,需要自己来实现签名,具体的实现方法可以参考:
iOS 签名杂谈(一):https://h4ck.org.cn/2020/06/7112
iOS 签名杂谈(二): https://h4ck.org.cn/2020/06/7130

虽然之前做个一个签名的图形界面工具,但是引入了一个库不支持arm架构,也懒得再更新了。现在就只能创建签名脚本签名了,来回修改多次之后,让cursor创建了一个自签名脚本,sign_with_args.sh。通过这个东西就可以快速签名文件了。

签名脚本代码:

#!/bin/bash

# 变量声明(无默认值)
MOBILEPROVISION=""
APP_PATH=""
CERTIFICATE=""
BUNDLE_ID=""
TEAM_ID=""
DEVICE_UDID=""
ENTITLEMENTS_FILE=""  # 新增:自定义 Entitlements 文件路径

# 显示帮助信息
show_help() {
    echo "用法: $0 [选项]"
    echo "选项:"
    echo "  -p, --provision    mobileprovision文件路径 (必需)"
    echo "  -a, --app-path     应用路径 (必需)"
    echo "  -c, --certificate  证书名称 (必需)"
    echo "  -b, --bundle-id    Bundle ID (必需)"
    echo "  -t, --team-id      Team ID (必需)"
    echo "  -d, --device-udid  设备UDID (必需)"
    echo "  -e, --entitlements Entitlements文件路径 (可选,默认从mobileprovision提取)"
    echo "  -h, --help         显示此帮助信息"
    exit 0
}

# 检查必需参数
check_required_params() {
    local missing=0
    if [ -z "$MOBILEPROVISION" ]; then
        echo "错误: 缺少 mobileprovision 文件路径 (-p)"
        missing=1
    fi
    if [ -z "$APP_PATH" ]; then
        echo "错误: 缺少应用路径 (-a)"
        missing=1
    fi
    if [ -z "$CERTIFICATE" ]; then
        echo "错误: 缺少证书名称 (-c)"
        missing=1
    fi
    if [ -z "$BUNDLE_ID" ]; then
        echo "错误: 缺少 Bundle ID (-b)"
        missing=1
    fi
    if [ -z "$TEAM_ID" ]; then
        echo "错误: 缺少 Team ID (-t)"
        missing=1
    fi
    if [ -z "$DEVICE_UDID" ]; then
        echo "错误: 缺少设备 UDID (-d)"
        missing=1
    fi
    if [ $missing -eq 1 ]; then
        echo "请使用 -h 或 --help 查看帮助信息"
        exit 1
    fi
}

# 解析命令行参数
while [[ $# -gt 0 ]]; do
    case $1 in
        -p|--provision)
            MOBILEPROVISION="$2"
            shift 2
            ;;
        -a|--app-path)
            APP_PATH="$2"
            shift 2
            ;;
        -c|--certificate)
            CERTIFICATE="$2"
            shift 2
            ;;
        -b|--bundle-id)
            BUNDLE_ID="$2"
            shift 2
            ;;
        -t|--team-id)
            TEAM_ID="$2"
            shift 2
            ;;
        -d|--device-udid)
            DEVICE_UDID="$2"
            shift 2
            ;;
        -e|--entitlements)
            ENTITLEMENTS_FILE="$2"
            shift 2
            ;;
        -h|--help)
            show_help
            ;;
        *)
            echo "未知选项: $1"
            show_help
            ;;
    esac
done

# 检查必需参数
check_required_params

# 清理函数
cleanup() {
    echo "清理临时文件..."
    rm -f temp_entitlements.plist
}

# 错误处理
handle_error() {
    echo "错误: $1"
    cleanup
    exit 1
}

# 检查文件是否存在
if [ ! -f "$MOBILEPROVISION" ]; then
    handle_error "mobileprovision 文件不存在: $MOBILEPROVISION"
fi

# 检查目录是否存在
if [ ! -d "$APP_PATH" ]; then
    handle_error "应用目录不存在: $APP_PATH"
fi

# 如果提供了自定义 Entitlements 文件,检查其是否存在
if [ ! -z "$ENTITLEMENTS_FILE" ] && [ ! -f "$ENTITLEMENTS_FILE" ]; then
    handle_error "Entitlements 文件不存在: $ENTITLEMENTS_FILE"
fi

# 验证配置文件
echo "验证配置文件..."
PROFILE_INFO=$(security cms -D -i "$MOBILEPROVISION")
if [ $? -ne 0 ]; then
    handle_error "配置文件无效"
fi

# 提取信息
echo "正在从 mobileprovision 提取信息..."
PROFILE_TEAM_ID=$(echo "$PROFILE_INFO" | plutil -extract TeamIdentifier.0 raw -)
PROFILE_APP_ID=$(echo "$PROFILE_INFO" | plutil -extract Entitlements.application-identifier raw -)
PROFILE_EXPIRATION=$(echo "$PROFILE_INFO" | plutil -extract ExpirationDate raw -)

echo "Profile Team ID: $PROFILE_TEAM_ID"
echo "Profile Application ID: $PROFILE_APP_ID"
echo "Profile Expiration: $PROFILE_EXPIRATION"

# 验证 Team ID
if [ "$PROFILE_TEAM_ID" != "$TEAM_ID" ]; then
    echo "警告: Team ID 不匹配"
    echo "Profile中的: $PROFILE_TEAM_ID"
    echo "设置的: $TEAM_ID"
    handle_error "请确保使用正确的 mobileprovision 文件"
fi

# 验证设备 UDID
echo "验证设备 UDID..."
if ! security cms -D -i "$MOBILEPROVISION" | grep -A 20 ProvisionedDevices | grep -q "$DEVICE_UDID"; then
    echo "错误: 设备 UDID $DEVICE_UDID 未包含在 provisioning profile 中"
    echo "包含的设备:"
    security cms -D -i "$MOBILEPROVISION" | grep -A 20 ProvisionedDevices
    handle_error "设备未授权"
fi
echo "设备 UDID 验证通过: $DEVICE_UDID"

# 设置完整的 Bundle ID
FULL_BUNDLE_ID="$PROFILE_APP_ID"
echo "使用 Bundle ID: $FULL_BUNDLE_ID"

# 清理旧的签名
echo "清理旧的签名..."
rm -rf "$APP_PATH/_CodeSignature" 2>/dev/null

# 复制 mobileprovision 并设置权限
echo "复制 mobileprovision..."
cp "$MOBILEPROVISION" "$APP_PATH/embedded.mobileprovision"
chmod 644 "$APP_PATH/embedded.mobileprovision"

# 处理 Entitlements
if [ ! -z "$ENTITLEMENTS_FILE" ]; then
    echo "使用自定义 Entitlements 文件: $ENTITLEMENTS_FILE"
    cp "$ENTITLEMENTS_FILE" temp_entitlements.plist
else
    echo "从 mobileprovision 提取 Entitlements..."
    security cms -D -i "$MOBILEPROVISION" | plutil -extract Entitlements xml1 -o - - > temp_entitlements.plist
fi

# 显示 entitlements 内容
echo "Entitlements 内容:"
plutil -p temp_entitlements.plist

# 设置正确的文件权限
echo "设置文件权限..."
chmod -R 755 "$APP_PATH"
find "$APP_PATH" -type f -exec chmod 644 {} \;
find "$APP_PATH" -name "*.dylib" -exec chmod 755 {} \;
[ -f "$APP_PATH/AirWall" ] && chmod 755 "$APP_PATH/AirWall"
[ -f "$APP_PATH/AirWallHelper" ] && chmod 755 "$APP_PATH/AirWallHelper"
[ -f "$APP_PATH/trollstorehelper" ] && chmod 755 "$APP_PATH/trollstorehelper"

# 移除空文件(特别是0字节的PNG文件)
echo "移除空文件..."
find "$APP_PATH" -type f -size 0 -delete
echo "已移除空文件"

# 修正Info.plist中的Bundle ID
echo "修正Info.plist中的Bundle ID..."
plutil -replace CFBundleIdentifier -string "$PROFILE_APP_ID" "$APP_PATH/Info.plist"
echo "Bundle ID已设置为: $(plutil -extract CFBundleIdentifier raw "$APP_PATH/Info.plist")"

# 对可执行文件进行签名
echo "对可执行文件进行签名..."
if [ -f "$APP_PATH/AirWallHelper" ]; then
    echo "签名 AirWallHelper..."
    codesign -f -s "$CERTIFICATE" --entitlements temp_entitlements.plist "$APP_PATH/AirWallHelper" || handle_error "AirWallHelper 签名失败"
fi

if [ -f "$APP_PATH/trollstorehelper" ]; then
    echo "签名 trollstorehelper..."
    codesign -f -s "$CERTIFICATE" --entitlements temp_entitlements.plist "$APP_PATH/trollstorehelper" || handle_error "trollstorehelper 签名失败"
fi

# 对所有的 frameworks 和 dylibs 进行签名
echo "签名 frameworks 和 dylibs..."
find "$APP_PATH" -name "*.framework" -o -name "*.dylib" | while read -r file; do
    echo "签名: $file"
    codesign -f -s "$CERTIFICATE" "$file" || handle_error "Framework/dylib 签名失败: $file"
done

# 对整个应用进行签名
echo "对整个应用进行签名..."
codesign -f -s "$CERTIFICATE" --entitlements temp_entitlements.plist --deep "$APP_PATH" || handle_error "应用签名失败"

# 验证签名
echo "验证签名..."
codesign -vv -d "$APP_PATH"

# 检查_CodeSignature目录
echo "检查_CodeSignature目录..."
if [ -d "$APP_PATH/_CodeSignature" ]; then
    echo "✓ _CodeSignature 目录存在"
    ls -la "$APP_PATH/_CodeSignature/"
else
    echo "⚠  _CodeSignature 目录不存在,这可能导致安装失败"
fi

# 显示更多签名信息
echo "显示详细签名信息..."
codesign -d --entitlements :- "$APP_PATH"

# 验证所有签名
echo "验证所有签名..."
if codesign --verify --deep --strict --verbose=4 "$APP_PATH"; then
    echo "✓ 严格验证通过"
else
    echo "⚠  严格验证失败,但基本签名可能仍然有效"
fi

# 清理临时文件
cleanup

# 重新打包
echo "重新打包..."
rm -f signed_AirWall.ipa
zip -qry signed_AirWall.ipa Payload

echo "签名完成!"


然而,在测试的时候发现com.apple.private私有权限,签名之后安装全部被拒绝了。那么,也就是说目前是没办法在非越狱系统访问这个文件的,自然也就没法更改壁纸。

原来是想把代码开源的,结果上传之后把自己的证书也放进去了。所以就没发开园啦,主要原理也说了,结论就是,目前不越狱是没办法修改carplay的壁纸的,所以可以不用尝试了。

附视频链接:

The post 苹果Carplay 自定义壁纸实现逻辑分析 appeared first on obaby@mars.

  •  

Baby CDN Debugger

2025年5月17日 22:03

昨天晚上打完球往家走的时候,看了下手机,收到杜郎的消息说网站挂了。

这种情况一般就是cdn的问题了。因为自己手机能获取到v6的地址,晚上还回复了几条评论。现在看来基本可以确认还是cdn出问题了。

后来倦意也@说证书变成自签名了。

到家看了下果然是cdn的问题,昨天的时候cdn域名9offibrx.cnvip.akdns.top解析的地址有下面几个:

111.180.205.158
111.180.205.154
117.50.201.110
57.180.25.103
61.136.162.23

后来在群里也看到有人说站点挂了,挂在了同一个节点上111.180.205.158。

如果要解决cdn节点问题,最简单的办法就是自建解析,排除掉有问题的节点。

新建A记录,选几个可用的ip地址添加上:

新建cname记录,将www和@解析到上面的域名即可:

之后等解析生效就可以了,生效之后那些失效的节点就被排除掉了。

不过要排除到底是节点问题还是什么问题,其实最简单的就是直接通过postman之类的工具测试。在进行节点测试的时候需要再header中取消原来的host,添加新的host才能自定义host。

这个测试通过postman的确可以,但是如果要再手机上测试就麻烦了。于是,我自己做了一个工具http://cd.h4ck.org.cn,可以简单的认为是个postman网页版。

上面的错误是因为直接访问节点,服务器的证书是自签名证书,关闭证书校验就能获取数据了。如下:

预览页面可以看到具体页面信息:

证书信息:

可以看到是lecdn的自签名证书,那么现在该怎么通过这个节点测试博客呢?

直接添加自定义host:

这样一切就正常了是不是?所以,如果要测试cdn的某个节点就可以通过上面的方式测试了。

同样,对于ipv6的节点也是支持的,默认访问上面的域名会根据当前网络状态返回v4或者v6地址,如果没有切换到v6,可以通过访问https://cd6.h4ck.org.cn,直接访问v6的地址。

还是一博客的v6ip为例:

其实被waf系统拦截了:

需要注意v6的ip地址拼接采用后面的形式:https://[2408:8214:e10:7210:2e2:69ff:fe39:d706]:443 知名端口号无需添加,可以省略80 443,会自动根据协议处理。

添加域名之后就可以了:

对于cdn以及waf可以通过同样的方式测试,测试文件也是可以的。

查看资源缓存状态:

以及其他类型的错误排查也是可以的:

工具地址:

IPv4 & IPv6访问

http://cd.h4ck.org.cn

IPv6 访问Only

https://cd6.h4ck.org.cn

注意:cd地址不支持v6服务器的探测,cd6地址支持v4以及v6服务器探测。

The post Baby CDN Debugger appeared first on obaby@mars.

  •  

FaceFusion 3.2.0 — 进阶体验(不要瑟瑟)

2025年5月11日 16:31

书接前文,如果要处理普通的视频资源,根据上一篇文章的内容完全就足够了。

但是,如果你想处理点多少有点暴露或者纯粹的瑟瑟内容,你是怎么都进行不下去滴。

启动脚本:补上一个快速启动face fusion的ps代码,保存为ps1,相关路径改成自己的,启动的时候直接拖到powershell里面执行即可。

conda deactivate
conda init
conda activate facefusion
cd  E:\facefusion3\facefusion
python facefusion.py run --open-browsers

现在来说下瑟瑟的问题,一般这时候会卡在分析完成的地方:

analysing:100%之后就没动静了,原因在于视频的分析完成之后发现你的视频有瑟瑟内容,而至于瑟瑟内容的检测是通过content_analyser.py中的detect_nsfw方法实现的,如下(这个是我改完的):

def detect_nsfw(vision_frame : VisionFrame) -> List[Score]:
    nsfw_scores = []
    model_size = get_model_options().get('size')
    temp_vision_frame = fit_frame(vision_frame, model_size)
    detect_vision_frame = prepare_detect_frame(temp_vision_frame)
    detection = forward(detect_vision_frame)
    detection = numpy.squeeze(detection).T
    nsfw_scores_raw = numpy.amax(detection[:, 4:], axis = 1)
    keep_indices = numpy.where(nsfw_scores_raw > 1.0)[0]

    if numpy.any(keep_indices):
        nsfw_scores_raw = nsfw_scores_raw[keep_indices]
        nsfw_scores = nsfw_scores_raw.ravel().tolist()

    return nsfw_scores

主要就是下面这一行,关于nsfw置信度的问题,原来是0.2 直接改到1.0就行了,毕竟,置信度不会超过1

keep_indices = numpy.where(nsfw_scores_raw > 1.0)[0]

重启进程,再次运行:

现在就会继续往下进行了。

视频资源文件导致的异常:最后来说下视频文件异常导致的崩溃,对于一些文件可能会出现下面的错误

Analysing:  95%|====================================================   | 3625/3800 [00:19<00:00, 189.67frame/s, rate=0]
Traceback (most recent call last):
  File "C:\Users\obaby\.conda\envs\facefusion\Lib\site-packages\gradio\queueing.py", line 625, in process_events
    response = await route_utils.call_process_api(
               ^^^^^^^^^^^^^^^^^^^^^^^^^^^^^^^^^^^
  File "C:\Users\obaby\.conda\envs\facefusion\Lib\site-packages\gradio\route_utils.py", line 322, in call_process_api
    output = await app.get_blocks().process_api(
             ^^^^^^^^^^^^^^^^^^^^^^^^^^^^^^^^^^^
  File "C:\Users\obaby\.conda\envs\facefusion\Lib\site-packages\gradio\blocks.py", line 2146, in process_api
    result = await self.call_function(
             ^^^^^^^^^^^^^^^^^^^^^^^^^
  File "C:\Users\obaby\.conda\envs\facefusion\Lib\site-packages\gradio\blocks.py", line 1664, in call_function
    prediction = await anyio.to_thread.run_sync(  # type: ignore
                 ^^^^^^^^^^^^^^^^^^^^^^^^^^^^^^^^^^^^^^^^^^^^^^^
  File "C:\Users\obaby\.conda\envs\facefusion\Lib\site-packages\anyio\to_thread.py", line 56, in run_sync
    return await get_async_backend().run_sync_in_worker_thread(
           ^^^^^^^^^^^^^^^^^^^^^^^^^^^^^^^^^^^^^^^^^^^^^^^^^^^^
  File "C:\Users\obaby\.conda\envs\facefusion\Lib\site-packages\anyio\_backends\_asyncio.py", line 2470, in run_sync_in_worker_thread
    return await future
           ^^^^^^^^^^^^
  File "C:\Users\obaby\.conda\envs\facefusion\Lib\site-packages\anyio\_backends\_asyncio.py", line 967, in run
    result = context.run(func, *args)
             ^^^^^^^^^^^^^^^^^^^^^^^^
  File "C:\Users\obaby\.conda\envs\facefusion\Lib\site-packages\gradio\utils.py", line 884, in wrapper
    response = f(*args, **kwargs)
               ^^^^^^^^^^^^^^^^^^
  File "E:\facefusion3\facefusion\facefusion\uis\components\instant_runner.py", line 82, in run
    create_and_run_job(step_args)
  File "E:\facefusion3\facefusion\facefusion\uis\components\instant_runner.py", line 97, in create_and_run_job
    return job_manager.create_job(job_id) and job_manager.add_step(job_id, step_args) and job_manager.submit_job(job_id) and job_runner.run_job(job_id, process_step)
                                                                                                                             ^^^^^^^^^^^^^^^^^^^^^^^^^^^^^^^^^^^^^^^^
  File "E:\facefusion3\facefusion\facefusion\jobs\job_runner.py", line 11, in run_job
    if run_steps(job_id, process_step) and finalize_steps(job_id):
       ^^^^^^^^^^^^^^^^^^^^^^^^^^^^^^^
  File "E:\facefusion3\facefusion\facefusion\jobs\job_runner.py", line 72, in run_steps
    if not run_step(job_id, index, step, process_step):
           ^^^^^^^^^^^^^^^^^^^^^^^^^^^^^^^^^^^^^^^^^^^
  File "E:\facefusion3\facefusion\facefusion\jobs\job_runner.py", line 58, in run_step
    if job_manager.set_step_status(job_id, step_index, 'started') and process_step(job_id, step_index, step_args):
                                                                      ^^^^^^^^^^^^^^^^^^^^^^^^^^^^^^^^^^^^^^^^^^^
  File "E:\facefusion3\facefusion\facefusion\core.py", line 323, in process_step
    error_code = conditional_process()
                 ^^^^^^^^^^^^^^^^^^^^^
  File "E:\facefusion3\facefusion\facefusion\core.py", line 340, in conditional_process
    return process_video(start_time)
           ^^^^^^^^^^^^^^^^^^^^^^^^^
  File "E:\facefusion3\facefusion\facefusion\core.py", line 418, in process_video
    if analyse_video(state_manager.get_item('target_path'), trim_frame_start, trim_frame_end):
       ^^^^^^^^^^^^^^^^^^^^^^^^^^^^^^^^^^^^^^^^^^^^^^^^^^^^^^^^^^^^^^^^^^^^^^^^^^^^^^^^^^^^^^
  File "E:\facefusion3\facefusion\facefusion\content_analyser.py", line 102, in analyse_video
    if analyse_frame(vision_frame):
       ^^^^^^^^^^^^^^^^^^^^^^^^^^^
  File "E:\facefusion3\facefusion\facefusion\content_analyser.py", line 77, in analyse_frame
    nsfw_scores = detect_nsfw(vision_frame)
                  ^^^^^^^^^^^^^^^^^^^^^^^^^
  File "E:\facefusion3\facefusion\facefusion\content_analyser.py", line 115, in detect_nsfw
    temp_vision_frame = fit_frame(vision_frame, model_size)
                        ^^^^^^^^^^^^^^^^^^^^^^^^^^^^^^^^^^^
  File "E:\facefusion3\facefusion\facefusion\vision.py", line 243, in fit_frame
    height, width = vision_frame.shape[:2]
                    ^^^^^^^^^^^^^^^^^^
AttributeError: 'NoneType' object has no attribute 'shape'

这些问题还是处在content_analyser.py 问题在于对vision_frame 为None的帧进行检测,导致检测进程崩了,这里提前判断下是否为空,当然,更直接的办法是直接全部返回False 禁用nsfw检测。

参考下面的方法修改代码即可。

def analyse_frame(vision_frame : VisionFrame) -> bool:
    if vision_frame is None:
        return False
    nsfw_scores = detect_nsfw(vision_frame)

    return len(nsfw_scores) > 0

好啦,最后来看看小视频吧:

如果用姐姐我的照片换脸视频了,换好的视频记得给我发一份,嘻嘻

The post FaceFusion 3.2.0 — 进阶体验(不要瑟瑟) appeared first on obaby@mars.

  •  

FaceFusion 3.2.0 — 免费AI换脸工具初体验

2025年5月10日 20:14

‌FaceFusion‌是一款功能强大的AI换脸软件,支持图片、视频和直播的换脸功能,其换脸效果真实、自然。FaceFusion不仅支持N卡处理程序(如Azure),还提供了CPU处理模式,适合各种硬件配置的用户使用‌。

功能特点:
  1. ‌多平台兼容‌:支持NVIDIA和AMD等主流显卡平台,满足不同用户的硬件需求‌。
  2. ‌多种处理模式‌:提供人脸替换、人脸高清修复和背景高清修复等多种策略,每种策略下包含多个模型可自由切换‌。
  3. ‌自定义设置‌:用户可以自定义执行线程、执行队列、最大内存和输出路径,电脑配置好的情况下可以适当调大这些参数‌。
  4. ‌预览功能‌:提供预览功能,可以自由选择换脸对象和多人换脸,单人换脸通过方位选择人脸、年龄选择人脸、以及性别选择人脸‌。
  5. ‌唇形同步‌:引入wave2lip处理器,同步口型动作,使视频更加自然‌。
  6. ‌面部对齐改进‌:通过68比5的地标变换,提高面部对齐的精确度‌。
  7. ‌新模型支持‌:增加uniface_256模型,提供更高质量的换脸选项;集成yoloface作为默认的人脸检测器模型,提升检测效率‌。

换脸这个东西,起之前也尝试过faceswap,然而,这个东西使用起来的确麻烦,需要提供的素材数量比较多,训练过程比较繁琐,并且最终的效果在样本数量不够大的时候就会发现实际效果一般:

让自己变成AV的主角【faceswap】

当然,图片换脸目前腾讯元宝提供了免费的传图换脸的功能,整体效果还是挺不错的。下面的是基于腾讯元宝来实现的:

不过,对于视频换脸的免费工具(手机上可用的),目前我还没发现,前端时间看到这个东西,于是尝试了一下。网上有个facefusion2.6.1压缩包版本,实际下载安装后,效果一般,由于缺少文件会导致无法运行,如果要使用的话,复制一个png文件,放到facefusion2.6.1\dependency\res目录下,命名为main.png即可。在运行过程中会显示这个图片。

之前还下载了一个DeepFaceLab_NVIDIA_RTX3000_series,这个东西要用比较麻烦的一点在于,只能靠命令一条一条的执行,看着目录下的文件就感觉头大了。

最终还是决定尝试下FaceFusion的最新版本,安装可以参考这个链接:Installation | FaceFusion

最简单方法,访问这个链接购买安装包:Windows Installer 20美元,解决了后面全部的问题。如果不想花20,那么继续往下看。

具体的步骤简单概述,以win11为准:

1.安装git conda ffmpeg

GIT
winget install -e --id Git.Git
Conda
winget install -e --id Anaconda.Miniconda3 --override "/AddToPath=1"
FFmpeg
winget install -e --id Gyan.FFmpeg

conda安装之后配置环境路径,添加到path下:

重启powershell继续后面的操作。

2.准备conda环境:

Initialize conda for your terminal:
conda init --all
Create the environment:
conda create --name facefusion python=3.12 pip=25.0
Activate the environment:
conda activate facefusion

3.安装gpu支持,我只有conda:

conda install conda-forge::cuda-runtime=12.8.1 conda-forge::cudnn=9.8.0.87

4.下载代码

git clone https://gitee.com/facefusion/facefusion
cd facefusion

5.安装(cuda)

python install.py --onnxruntime cuda

6.重新激活环境:

conda deactivate
conda activate facefusion

7.运行系统:

python facefusion.py run --open-browser

启动之后会自动下载各种特征文件,如果下载不动就多试几次,或者尝试挂个全局代理

现在就可以尝试换脸了:

按图选择模块进行换脸,此时就完成之后就可以下载了:

实际效果:

另外一个视频520AM:

实际效果就是这样的,不过安装的时候需要注意用户名路径不要存在中文。另外,这个东西貌似处理a片有问题,会报下面的错误,感觉还是视频文件问题,谁知道怎么解决的还望不吝赐教:

Traceback (most recent call last):
  File "C:\Users\obaby\.conda\envs\facefusion\Lib\site-packages\gradio\queueing.py", line 625, in process_events
    response = await route_utils.call_process_api(
               ^^^^^^^^^^^^^^^^^^^^^^^^^^^^^^^^^^^
  File "C:\Users\obaby\.conda\envs\facefusion\Lib\site-packages\gradio\route_utils.py", line 322, in call_process_api
    output = await app.get_blocks().process_api(
             ^^^^^^^^^^^^^^^^^^^^^^^^^^^^^^^^^^^
  File "C:\Users\obaby\.conda\envs\facefusion\Lib\site-packages\gradio\blocks.py", line 2146, in process_api
    result = await self.call_function(
             ^^^^^^^^^^^^^^^^^^^^^^^^^
  File "C:\Users\obaby\.conda\envs\facefusion\Lib\site-packages\gradio\blocks.py", line 1664, in call_function
    prediction = await anyio.to_thread.run_sync(  # type: ignore
                 ^^^^^^^^^^^^^^^^^^^^^^^^^^^^^^^^^^^^^^^^^^^^^^^
  File "C:\Users\obaby\.conda\envs\facefusion\Lib\site-packages\anyio\to_thread.py", line 56, in run_sync
    return await get_async_backend().run_sync_in_worker_thread(
           ^^^^^^^^^^^^^^^^^^^^^^^^^^^^^^^^^^^^^^^^^^^^^^^^^^^^
  File "C:\Users\obaby\.conda\envs\facefusion\Lib\site-packages\anyio\_backends\_asyncio.py", line 2470, in run_sync_in_worker_thread
    return await future
           ^^^^^^^^^^^^
  File "C:\Users\obaby\.conda\envs\facefusion\Lib\site-packages\anyio\_backends\_asyncio.py", line 967, in run
    result = context.run(func, *args)
             ^^^^^^^^^^^^^^^^^^^^^^^^
  File "C:\Users\obaby\.conda\envs\facefusion\Lib\site-packages\gradio\utils.py", line 884, in wrapper
    response = f(*args, **kwargs)
               ^^^^^^^^^^^^^^^^^^
  File "E:\facefusion3\facefusion\facefusion\uis\components\job_runner.py", line 91, in run
    if job_id and job_runner.run_job(job_id, process_step):
                  ^^^^^^^^^^^^^^^^^^^^^^^^^^^^^^^^^^^^^^^^
  File "E:\facefusion3\facefusion\facefusion\jobs\job_runner.py", line 11, in run_job
    if run_steps(job_id, process_step) and finalize_steps(job_id):
       ^^^^^^^^^^^^^^^^^^^^^^^^^^^^^^^
  File "E:\facefusion3\facefusion\facefusion\jobs\job_runner.py", line 72, in run_steps
    if not run_step(job_id, index, step, process_step):
           ^^^^^^^^^^^^^^^^^^^^^^^^^^^^^^^^^^^^^^^^^^^
  File "E:\facefusion3\facefusion\facefusion\jobs\job_runner.py", line 58, in run_step
    if job_manager.set_step_status(job_id, step_index, 'started') and process_step(job_id, step_index, step_args):
                                                                      ^^^^^^^^^^^^^^^^^^^^^^^^^^^^^^^^^^^^^^^^^^^
  File "E:\facefusion3\facefusion\facefusion\core.py", line 323, in process_step
    error_code = conditional_process()
                 ^^^^^^^^^^^^^^^^^^^^^
  File "E:\facefusion3\facefusion\facefusion\core.py", line 340, in conditional_process
    return process_video(start_time)
           ^^^^^^^^^^^^^^^^^^^^^^^^^
  File "E:\facefusion3\facefusion\facefusion\core.py", line 418, in process_video
    if analyse_video(state_manager.get_item('target_path'), trim_frame_start, trim_frame_end):
       ^^^^^^^^^^^^^^^^^^^^^^^^^^^^^^^^^^^^^^^^^^^^^^^^^^^^^^^^^^^^^^^^^^^^^^^^^^^^^^^^^^^^^^
  File "E:\facefusion3\facefusion\facefusion\content_analyser.py", line 102, in analyse_video
    if analyse_frame(vision_frame):
       ^^^^^^^^^^^^^^^^^^^^^^^^^^^
  File "E:\facefusion3\facefusion\facefusion\content_analyser.py", line 77, in analyse_frame
    nsfw_scores = detect_nsfw(vision_frame)
                  ^^^^^^^^^^^^^^^^^^^^^^^^^
  File "E:\facefusion3\facefusion\facefusion\content_analyser.py", line 115, in detect_nsfw
    temp_vision_frame = fit_frame(vision_frame, model_size)
                        ^^^^^^^^^^^^^^^^^^^^^^^^^^^^^^^^^^^
  File "E:\facefusion3\facefusion\facefusion\vision.py", line 243, in fit_frame
    height, width = vision_frame.shape[:2]
                    ^^^^^^^^^^^^^^^^^^
AttributeError: 'NoneType' object has no attribute 'shape'


系统默认缓存目录为:

C:\Users\obaby\AppData\Local\Temp\facefusion

要修改这个路径,修改 facefusion.ini文件:

[paths]
temp_path = ./temp
jobs_path =
source_paths =
target_path =
output_path =

修改完重启即可:

2.6.1版本安装包:

https://www.123pan.com/s/5DsaTd-5YGc.html

链接:https://pan.quark.cn/s/11bffd2d5993
提取码:ankQ

The post FaceFusion 3.2.0 — 免费AI换脸工具初体验 appeared first on obaby@mars.

  •  

是 IPv6 吖 — V6 重生记

2025年3月31日 10:27

上周五的时候,在杜老师的聊天室聊天,hehe 提到一个关于家里 ipv6 地址申请的问题。这时候才想到自己家里的网络应该也是有 ipv6 的地址的。至于地址是不是公网的那就不知道了。

而至于想要弄这个东西,其实还有一个原因是 he.net 的 ipv6 徽章已经很久没更新了,还差最后一步 ipv6 only 的网络访问测试,而测试的域名就是 h4ck.org.cn。
IPv6 Certification Badge for obaby

为了通过这个测试,自然要折腾一下。通过之后,he说会免费邮寄一个 T 恤衫,尺码和地址都更新了。不过这跨国的快递,不知道能不能收到。

至于能不能收到,这就只能耐心等待啦。

远程登录路由器,直接访问 ip 地址,然后高级的一幕就出现了,竟然直接打开了路由器的登录页面:

那么也就是说联通在 v6 协议下竟然没有封禁 80 端口,这样的话我忽然就有了个大胆的想法。如果路由器将 v6 的映射打开,直接访问 v6 的地址,忽略证书错误。然后网站就顺利打开了:

既然如此,那么这一来也解决了自己的 cdn 流量超限的问题。

这个月流量超限之后,买了 100G 的扩展包,结果就用了四天就又没了。为了解决流量问题,文章中的视频,直接通过 url 转发了。而至于首页右下角的图片就直接去掉了。不知道是访问量还是神马问题,这些图片一天跑十几个 G 的流量。

然而,到现在就出现了另外几个问题,要想让网站直接在互联网上访问,没有任何的防护措施,的确感觉不怎么靠谱。

1.家里的 V6 地址也是动态的,需要能够动态更新 ipv6 的 AAAA 记录。

2.在家里的主机上安装 waf 系统,提供基础的防御功能。

3.其他的未知问题。

AAAA 记录

在测试的时候,添加 AAAA 记录,会因为存在 cname 记录而导致添加失败,AAAA 记录和 CNAME 记录有冲突,请先删除或暂停现有的 CNAME 记录后重试:

此时针对不同的线路分别添加解析就 ok 了:

那么,在这之后就来到了第二个问题,怎么获取本地的公网 ipv6地址。

最直接的想法是直接通过获取 ipv4 地址类似的写法,来获取 ipv6 的地址,让 cursor 给写了类似的代码:

def get_ipv6_by_httpbin():
    """通过 httpbin.org 获取 IPv6 地址"""
    url = 'https://api6.ipify.org?format=json'
    try:
        resp = request.urlopen(url=url, timeout=10).read()
        data = json.loads(resp.decode("utf-8"))
        if 'ip' in data:
            return data['ip']
        return None
    except Exception as e:
        logging.warning("get_ipv6_by_httpbin FAILED, error: %s", str(e))
        return None

def get_ipv6_by_icanhazip():
    """通过 icanhazip.com 获取 IPv6 地址"""
    url = 'https://icanhazip.com'
    try:
        resp = request.urlopen(url=url, timeout=10).read()
        ip = resp.decode("utf-8").strip()
        if regex_ipv6.match(ip):
            return ip
        return None
    except Exception as e:
        logging.warning("get_ipv6_by_icanhazip FAILED, error: %s", str(e))
        return None

def get_ipv6_by_ident_me():
    """通过 ident.me 获取 IPv6 地址"""
    url = 'https://v6.ident.me'
    try:
        resp = request.urlopen(url=url, timeout=10).read()
        ip = resp.decode("utf-8").strip()
        if regex_ipv6.match(ip):
            return ip
        return None
    except Exception as e:
        logging.warning("get_ipv6_by_ident_me FAILED, error: %s", str(e))
        return None

实际证明,代码写的不错,在自己的 mac 电脑上的确可以获取到 ipv6 的地址。

然而,在家里的服务器上却使用无法获取 ip 地址,所有 v6 协议的服务都是超时状态。搜索了一堆,问了一大圈的 ai,最终都没解决问题。

后来猜测是不是路由器的问题,于是重新登录路由器的 v6 配置页面,来回切换配置:

看网上有文章会所需要改为 slaac 模式,改过去之后无效,切换成原来的自动,继续沿用上面的配置。断线重连结果网络就好啦。注意,这两个 dns 是腾讯的 dns,不是联通默认的 dns。

然而,此时就出现了另外一个问题,直到这时候我才发现,获取到的这个地址是本地的 v6 地址,而不是路由器的 v6 地址,当然,更恐怖的是这个 v6 地址也是可以在互联网直接访问的。

那么怎么自动更新这个 dns 记录就成了问题,总不能自己去天天改啊。

问小杜无果之后,继续尝试通过路由或者 tracerout 的方式获取,最终都以失败告终。至此,简单的方法算是彻底没了招了,那么就剩下一条路了,之计通过路由器获取,然鹅,tplink 的企业路由器并没有开放相关的 api。只能自己去找接口。

结果在登录页面就被来了个下马威,获取到接口,让 cursor 写完代码之后登录不了。

看起来页面很简单不是,但是这个东西恶心的地方在于登录的密码是加密过得,直接使用明文密码是登录不了的。不过好在这个密码不是动态加密的,直接使用密码登录,截取登录的加密后密码进行登录就 ok 了。剩下的就是获取 ipv6 地址,更新 dnspod 的aaaa 记录:

tplink 相关代码:

import requests
import json
import urllib.parse

def login_tplink(ip, username, password):
    """
    Login to TP-Link router
    :param ip: Router IP address
    :param username: Login username
    :param password: Login password
    :return: Response from the router and stok if successful
    """
    url = f"http://{ip}/"
    
    headers = {
        'Accept': 'text/plain, */*; q=0.01',
        'Accept-Language': 'zh-CN,zh;q=0.9,en-US;q=0.8,en;q=0.7',
        'Cache-Control': 'no-cache',
        'Connection': 'keep-alive',
        'Content-Type': 'application/json; charset=UTF-8',
        'Origin': f'http://{ip}',
        'Pragma': 'no-cache',
        'Referer': f'http://{ip}/login.htm',
        'User-Agent': 'Mozilla/5.0 (Windows NT 10.0; Win64; x64) AppleWebKit/537.36 (KHTML, like Gecko) Chrome/132.0.0.0 Safari/537.36',
        'X-Requested-With': 'XMLHttpRequest'
    }
    
    data = {
        "method": "do",
        "login": {
            "username": username,
            "password": password
        }
    }
    
    try:
        response = requests.post(
            url,
            headers=headers,
            json=data,
            verify=False
        )
        if response.status_code == 200:
            try:
                response_data = response.json()
                if 'stok' in response_data:
                    return response_data['stok']
            except json.JSONDecodeError:
                print("Failed to parse login response as JSON")
        return None
    except requests.exceptions.RequestException as e:
        print(f"Login error occurred: {e}")
        return None

def get_network_info(ip, stok):
    """
    Get network information from TP-Link router
    :param ip: Router IP address
    :param stok: Session token from login
    :return: Network information response
    """
    url = f"http://{ip}/stok={stok}/ds"
    
    headers = {
        'Accept': 'text/plain, */*; q=0.01',
        'Accept-Language': 'zh-CN,zh;q=0.9,en-US;q=0.8,en;q=0.7',
        'Cache-Control': 'no-cache',
        'Connection': 'keep-alive',
        'Content-Type': 'application/json; charset=UTF-8',
        'Origin': f'http://{ip}',
        'Pragma': 'no-cache',
        'Referer': f'http://{ip}/',
        'User-Agent': 'Mozilla/5.0 (Windows NT 10.0; Win64; x64) AppleWebKit/537.36 (KHTML, like Gecko) Chrome/132.0.0.0 Safari/537.36',
        'X-Requested-With': 'XMLHttpRequest'
    }
    
    data = {
        "method": "get",
        "network": {
            "table": "if_info"
        }
    }
    
    try:
        response = requests.post(
            url,
            headers=headers,
            json=data,
            verify=False
        )
        return response
    except requests.exceptions.RequestException as e:
        print(f"Network info error occurred: {e}")
        return None

def get_wan1_pppoe_addresses(response_data):
    """
    Parse IPv4 and IPv6 addresses from network info response
    :param response_data: JSON response data
    :return: Dictionary containing IPv4 and IPv6 addresses
    """
    addresses = {
        'ipv4': None,
        'ipv6': None
    }
    
    try:
        if_info = response_data.get('network', {}).get('if_info', [])
        for interface in if_info:
            if 'wan1_pppoe' in interface:
                wan_data = interface['wan1_pppoe']
                if 'ipaddr' in wan_data:
                    addresses['ipv4'] = wan_data['ipaddr']
                if 'ip6addr' in wan_data:
                    addresses['ipv6'] = urllib.parse.unquote(wan_data['ip6addr'])
                break
    except Exception as e:
        print(f"Error parsing wan1_pppoe addresses: {e}")
    
    return addresses

def update_ipv6_nat_mapping(ip, stok, dest_ip):
    """
    Update IPv6 NAT mapping on TP-Link router
    :param ip: Router IP address
    :param stok: Session token from login
    :param dest_ip: Destination IPv6 address
    :return: Response from the router
    """
    url = f"http://{ip}/stok={stok}/ds"
    
    headers = {
        'Accept': 'text/plain, */*; q=0.01',
        'Accept-Language': 'zh-CN,zh;q=0.9,en-US;q=0.8,en;q=0.7',
        'Cache-Control': 'no-cache',
        'Connection': 'keep-alive',
        'Content-Type': 'application/json; charset=UTF-8',
        'Origin': f'http://{ip}',
        'Pragma': 'no-cache',
        'Referer': f'http://{ip}/',
        'User-Agent': 'Mozilla/5.0 (Windows NT 10.0; Win64; x64) AppleWebKit/537.36 (KHTML, like Gecko) Chrome/132.0.0.0 Safari/537.36',
        'X-Requested-With': 'XMLHttpRequest'
    }
    
    # URL encode the IPv6 address
    encoded_dest_ip = urllib.parse.quote(dest_ip)
    
    data = {
        "method": "set",
        "firewall": {
            "redirect_4313056213": {
                "name": "mac_server_v6",
                "ip_proto": "IPv6",
                "if": ["WAN"],
                "src_dport": "443",
                "dest_port": "443",
                "dest_ip": encoded_dest_ip,
                "proto": "ALL",
                "loopback_ipaddr": "",
                "enable": "on",
                "src_dport_start": "65536",
                "src_dport_end": "65536",
                "dest_port_start": "65536",
                "dest_port_end": "65536"
            }
        }
    }
    
    try:
        response = requests.post(
            url,
            headers=headers,
            json=data,
            verify=False
        )
        return response
    except requests.exceptions.RequestException as e:
        print(f"Error updating IPv6 NAT mapping: {e}")
        return None

if __name__ == "__main__":
    # Disable SSL warnings
    requests.packages.urllib3.disable_warnings()
    
    # Router credentials
    ip = '192.168.1.1'
    username = 'obaby'
    password = '123456***加密后密码'
    
    # First login to get stok
    stok = login_tplink(ip, username, password)
    
    if stok:
        print(f"Login successful! Got stok: {stok}")
        
        # Get network information using the stok
        network_response = get_network_info(ip, stok)
        
        if network_response:
            try:
                response_data = network_response.json()
                addresses = get_wan1_pppoe_addresses(response_data)
                
                print("\nWAN1 PPPoE Addresses:")
                if addresses['ipv4']:
                    print(f"IPv4: {addresses['ipv4']}")
                if addresses['ipv6']:
                    print(f"IPv6: {addresses['ipv6']}")
                    
                    # Update NAT mapping with the IPv6 address
                    nat_response = update_ipv6_nat_mapping(ip, stok, addresses['ipv6'])
                    if nat_response:
                        print(f"NAT mapping update response: {nat_response.text}")
                    else:
                        print("Failed to update NAT mapping")
            except json.JSONDecodeError:
                print("Failed to parse network response as JSON")
        else:
            print("Failed to get network information")
    else:
        print("Login failed!")

至此第一个问题解决了。

开始第二个小问题,更新 aaaa 记录,这个就比较简单了,直接让 curosr 写就行了:

def get_record_id(domain, sub_domain, record_type='A', record_line='默认'):
    """获取记录ID,支持A和AAAA记录,以及不同的记录线路"""
    url = 'https://dnsapi.cn/Record.List'
    params = parse.urlencode({
        'login_token': cfg['login_token'],
        'format': 'json',
        'domain': domain
    })
    req = request.Request(url=url, data=params.encode('utf-8'), method='POST', headers=header())
    try:
        resp = request.urlopen(req).read().decode()
    except (error.HTTPError, error.URLError, socket.timeout):
        return None
    records = json.loads(resp).get('records', {})
    for item in records:
        if (item.get('name') == sub_domain and 
            item.get('type') == record_type and 
            item.get('line') == record_line):
            return item.get('id')
    return None

def update_ipv6_record(current_ipv6):
    """更新IPv6记录,支持多个记录和不同的记录线路"""
    ipv6_count = int(cfg.get('ipv6_count', '1'))
    ipv6_pool = cfg.get('ipv6_pool', '').split(',')[:ipv6_count]
    cfg['current_ipv6'] = current_ipv6
    
    if current_ipv6 not in ipv6_pool:
        logging.info("new IPv6 found: %s", current_ipv6)
        ipv6_pool.insert(0, current_ipv6)
        cfg['ipv6_pool'] = ','.join([str(x) for x in ipv6_pool[:ipv6_count]])
        
        # 获取所有需要更新的AAAA记录配置
        aaaa_records = cfg.get('aaaa_records', '').split(',')
        for record in aaaa_records:
            if not record.strip():
                continue
            try:
                sub_domain, record_line = record.strip().split(':')
                if update_record('AAAA', current_ipv6, record_line, sub_domain):
                    logging.info(f"成功更新AAAA记录: {sub_domain}.{cfg['domain']} 线路: {record_line}")
                else:
                    logging.error(f"更新AAAA记录失败: {sub_domain}.{cfg['domain']} 线路: {record_line}")
            except ValueError:
                logging.error(f"无效的AAAA记录配置: {record}")
        save_config()
    else:
        logging.info('IPv6 地址无变化,跳过更新')

到这里网站就能正常访问了。

WAF:雷池&南墙

至于 waf 系统,其实自己之前也没怎么系统了解过,也是杜老师推荐了这两个。首先尝试的是雷池,也是杜老师最开始推荐的。

雷池:

个人版是免费的,相对来说配置也比较简单。

官网地址:https://waf-ce.chaitin.cn

自动安装一行命令即可:

bash -c "$(curl -fsSLk https://waf-ce.chaitin.cn/release/latest/manager.sh)"

安装为 docker 模式,相对来说侵入性比较小一些。并且不需要占用 80,443 端口,这一点其实相对比南墙安装配置要求要低一些。

安装之后就可以通过 9443 端口登录了。相关功能示例:

系统概览,不知道是不是因为是 v6 地址的原因,左侧地图都是空白的。

同样,这个地球上也是空白的,底部的功能都需要专业版才能查看

防护模块是全部可用的

加强防御需要专业版

通用配置模块也是 ok 的。

整体来说安装过程比较顺畅也没遇到什么问题,不过访问 ip 由于是通过路由转发进来的需要从 x-forward-for中取这个信息。

南墙

开源免费的 waf 系统

官网地址:https://waf.uusec.com/#/

在使用过程中遇到点问题,不过最后在他们的技术帮助下顺利解决了。在安装之后,首先遇到的问题就是获取的 ip 地址有问题,都是本地的地址。并且不管怎么选择地址,最后都是同一个 ip 地址。

使用测速工具测速之后,ip 地址还是一个,这肯定是有问题的。在群里问了一下,给了个指令修复这个问题:

firewall-cmd --permanent --zone=internal --change-interface=docker0
systemctl restart firewalld && systemctl daemon-reload && systemctl restart docker

不过这么执行之后可能会出现的问题就是所有的服务都访问不了了,需要在 public 区域重新开放相关服务:

sudo firewall-cmd --zone=public --permanent --add-port=10043/tcp
sudo firewall-cmd --zone=public --permanent --add-port=14443/tcp
sudo firewall-cmd --zone=public --permanent --add-port=880/tcp
sudo firewall-cmd --zone=public --permanent --add-port=3306/tcp
sudo firewall-cmd --zone=public --permanent --add-port=9443/tcp
sudo firewall-cmd --zone=public --permanent --add-port=8443/tcp

其他需要开放的服务和端口自行添加即可。

然而,这个命令并没有解决问题。包括卸载重装,其实重装这件事情对我来说有些麻烦,因为服务器的默认 80 和 443 都映射到公网了,如果直接改了也比较麻烦,只能去工控机上停掉 80 的监听,443 的修改端口重新添加映射,毕竟这台主机上相对服务少一些。

重新安装依然没解决问题,这时候提议安装主机版。

然而,更尴尬的事情粗线了,那就是主机版不支持 ubuntu,只能作罢继续使用 docker 版本。

并且安装主机版,需要提前备份数据库,安装脚本会重装 mysql。这一点一定要注意!

这时候管理员提议远程协助,于是将端口映射出去,提供账号密码,等管理员修复。

管理说可能是映射的问题,然而,雷池的没问题,那么说明一定是有解决办法的,管理提到 docker 的网络配置不一样的,于是提议修改网络配置。

最终,亲爱的管理员,成功的修复了问题:

这样这个问题算是解决了,整体而言,感觉雷池的在 v6 测速的时候更绿一些。

好啦,相对来说雷池基本所有的模块都是开放的,除了机器学习部分:

安全态势

系统信息

用户管理

日志

证书管理,这个证书管理直接上传即可,不需要去进行绑定。

cdn 加速,其实感觉更像缓存配置。

规则管理

网站管理,得添加多个。

整体来说体验还是不错的,然而,刚才去看了配置文件感觉还是 bridge 啊。奇怪了。

不过既然问题解决了,那也就不纠结了。

官方文档说明:

https://waf.uusec.com/#/guide/problems?id=%f0%9f%8d%8b-%e5%a6%82%e4%bd%95%e8%a7%a3%e5%86%b3%e5%8d%97%e5%a2%99docker%e7%89%88%e8%8e%b7%e5%8f%96%e7%9a%84%e5%ae%a2%e6%88%b7%e7%ab%afip%e4%b8%ba172%e7%9a%84%e9%97%ae%e9%a2%98%ef%bc%9f


🍋 解决部分南墙容器版获取的客户端ip为网桥ip的问题?

1.将Docker网桥加入到防火墙的internal区域,以便获取到真实的IP地址, 假设Docker网桥名称为docker0

firewall-cmd --permanent --zone=internal --change-interface=docker0
systemctl restart firewalld && systemctl daemon-reload && systemctl restart docker

2.如果方法1无效,可以修改docker-compose.yml文件,将uuwaf容器的网络设置为network_mode: host,同时修改数据库连接环境变量UUWAF_DB_DSN中的wafdb为127.0.0.1,并映射wafdb容器的3306端口,重启后生效。


其他问题

鉴于主机获取的 ipv6 地址能直接访问,其实我一度想直接把主机的地址更新到 dns aaaa 记录上,但是这么一搞,暴露主机的确不是我最终想要的。

于是想着映射本地的链路地址,然而,端口映射通过链路地址通过路由器的 v6 地址却打不开网站,但是这个链路地址在内网的主机上又能打开网站,于是只能放弃这个做法。获取 ipv6 地址的代码:

import re
import logging
import json
import subprocess
import socket
import os
from urllib import request, error, parse

# 匹配合法 IPv6 地址
regex_ipv6 = re.compile(
    r"(?:inet6\s+)?(fe80:[0-9a-fA-F:]+|"  # 特别处理链路本地地址格式
    + r"(?:[0-9a-fA-F]{1,4}:){7}[0-9a-fA-F]{1,4}|"  # 标准格式
    + r"(?:[0-9a-fA-F]{1,4}:){6}:[0-9a-fA-F]{1,4}|"  # 压缩格式
    + r"(?:[0-9a-fA-F]{1,4}:){5}(?::[0-9a-fA-F]{1,4}){1,2}|"
    + r"(?:[0-9a-fA-F]{1,4}:){4}(?::[0-9a-fA-F]{1,4}){1,3}|"
    + r"(?:[0-9a-fA-F]{1,4}:){3}(?::[0-9a-fA-F]{1,4}){1,4}|"
    + r"(?:[0-9a-fA-F]{1,4}:){2}(?::[0-9a-fA-F]{1,4}){1,5}|"
    + r"(?:[0-9a-fA-F]{1,4}:){1}(?::[0-9a-fA-F]{1,4}){1,6}|"
    + r"(?::[0-9a-fA-F]{1,4}){1,7}|"
    + r"::"
    + r")")

# 特别匹配链路本地 IPv6 地址,确保能匹配到 fe80:: 开头的地址
regex_link_local_ipv6 = re.compile(r"inet6\s+(fe80:[0-9a-fA-F:]+)")

def get_ipv6():
    """获取公网 IPv6 地址,使用多个备选方法"""
    return (get_ipv6_by_ifconfig()  # 优先使用本地接口地址
        or get_ipv6_by_httpbin()
        or get_ipv6_by_icanhazip()
        or get_ipv6_by_ident_me()
        or get_ipv6_by_socket())

def get_ipv6_by_ifconfig():
    """通过 ifconfig 命令获取本地 IPv6 地址"""
    try:
        # Windows 系统使用 ipconfig
        if os.name == 'nt':
            cmd = ['ipconfig']
            output = subprocess.check_output(cmd, text=True)
        # Linux/Unix 系统使用 ifconfig
        else:
            cmd = ['ifconfig']
            output = subprocess.check_output(cmd, text=True)
            
        # 按行分割输出
        lines = output.split('\n')
        for line in lines:
            # 查找包含 inet6 的行
            if 'inet6' in line:
                # 使用正则表达式提取 IPv6 地址
                matches = regex_ipv6.findall(line)
                if matches:
                    ipv6 = matches[0]
                    # 排除本地回环地址
                    if not ipv6.startswith('::1'):
                        logging.info(f"Found IPv6 address: {ipv6}")
                        return ipv6
    except Exception as e:
        logging.warning("get_ipv6_by_ifconfig FAILED, error: %s", str(e))
    return None

def get_ipv6_by_socket():
    """通过 Python socket 库获取本地 IPv6 地址"""
    try:
        # 创建一个 IPv6 socket
        s = socket.socket(socket.AF_INET6, socket.SOCK_DGRAM)
        # 连接到一个外部地址(这里使用 Google 的 IPv6 DNS)
        s.connect(('2001:4860:4860::8888', 80))
        # 获取本地地址
        local_addr = s.getsockname()[0]
        s.close()
        return local_addr
    except Exception as e:
        logging.warning("get_ipv6_by_socket FAILED, error: %s", str(e))
        return None

def get_ipv6_by_httpbin():
    """通过 httpbin.org 获取 IPv6 地址"""
    url = 'https://api6.ipify.org?format=json'
    try:
        resp = request.urlopen(url=url, timeout=10).read()
        data = json.loads(resp.decode("utf-8"))
        if 'ip' in data:
            return data['ip']
        return None
    except Exception as e:
        logging.warning("get_ipv6_by_httpbin FAILED, error: %s", str(e))
        return None

def get_ipv6_by_icanhazip():
    """通过 icanhazip.com 获取 IPv6 地址"""
    url = 'https://icanhazip.com'
    try:
        resp = request.urlopen(url=url, timeout=10).read()
        ip = resp.decode("utf-8").strip()
        if regex_ipv6.match(ip):
            return ip
        return None
    except Exception as e:
        logging.warning("get_ipv6_by_icanhazip FAILED, error: %s", str(e))
        return None

def get_ipv6_by_ident_me():
    """通过 ident.me 获取 IPv6 地址"""
    url = 'https://v6.ident.me'
    try:
        resp = request.urlopen(url=url, timeout=10).read()
        ip = resp.decode("utf-8").strip()
        if regex_ipv6.match(ip):
            return ip
        return None
    except Exception as e:
        logging.warning("get_ipv6_by_ident_me FAILED, error: %s", str(e))
        return None

def get_link_local_ipv6():
    """专门获取链路本地 IPv6 地址"""
    try:
        # Windows 系统使用 ipconfig
        if os.name == 'nt':
            cmd = ['ipconfig']
            output = subprocess.check_output(cmd, text=True)
        # Linux/Unix 系统使用 ifconfig
        else:
            cmd = ['ifconfig']
            output = subprocess.check_output(cmd, text=True)
            
        # 按行分割输出
        lines = output.split('\n')
        for line in lines:
            # 查找包含 inet6 的行
            if 'inet6' in line:
                # 提取 IPv6 地址和 prefixlen
                if 'prefixlen 64' in line and 'scopeid 0x20<link>' in line:
                    # 调试输出
                    logging.debug(f"Processing line: {line}")
                    
                    # 使用特定正则表达式提取链路本地 IPv6 地址
                    matches = regex_link_local_ipv6.findall(line)
                    if matches:
                        ipv6 = matches[0]
                        logging.info(f"Found link-local IPv6 address with new regex: {ipv6}")
                        return ipv6
                    
                    # 如果特定正则表达式没有匹配到,尝试使用一般性正则表达式
                    matches = regex_ipv6.findall(line)
                    if matches:
                        ipv6 = matches[0]
                        logging.debug(f"Original regex matched: {ipv6}")
                        # 只返回链路本地地址
                        if ipv6.startswith('fe80'):
                            logging.info(f"Found link-local IPv6 address with original regex: {ipv6}")
                            return ipv6
                        elif 'fe80' in line:
                            # 如果行中包含fe80但匹配失败,记录错误
                            logging.warning(f"Regex failed to match fe80 in: {line}")
    except Exception as e:
        logging.warning("get_link_local_ipv6 FAILED, error: %s", str(e))
    return None

# 测试
if __name__ == '__main__':
    logging.basicConfig(level=logging.DEBUG)
    
    # 测试特定的 IPv6 地址匹配
    test_line = "inet6 fe80::e4d:e9ff:fec9:9de3  prefixlen 64  scopeid 0x20<link>"
    print("Testing regex with line:", test_line)
    
    # 测试链路本地特定正则
    matches = regex_link_local_ipv6.findall(test_line)
    if matches:
        print("Link-local regex matched:", matches[0])
    else:
        print("Link-local regex failed to match")
    
    # 测试一般 IPv6 正则
    matches = regex_ipv6.findall(test_line)
    if matches:
        print("General IPv6 regex matched:", matches[0])
    else:
        print("General IPv6 regex failed to match")
    
    print("\n--- Regular program output ---")
    print("Method 1 (httpbin):", get_ipv6_by_httpbin())
    print("Method 2 (icanhazip):", get_ipv6_by_icanhazip())
    print("Method 3 (ident.me):", get_ipv6_by_ident_me())
    print("Method 4 (ifconfig):", get_ipv6_by_ifconfig())
    print("Method 5 (socket):", get_ipv6_by_socket())
    print("Link-local IPv6:", get_link_local_ipv6())

获取到 v6 地址,就可以通过 tplink 的映射代码update_ipv6_nat_mapping进行地址映射了。

如果要用这个代码,需要根据自己的路由器配置获取映射的 id。

整体来说,速度还是可以的: 


The post 是 IPv6 吖 — V6 重生记 appeared first on obaby@mars.

  •  

❤️闺蜜圈(大姨妈记录) APP/H5/小程序[置顶] — 3.0.06(更新时间:2025.03.12)

2025年3月12日 10:06

时隔半年之后,我带来了另外一次更新,这次主要是接入了 deepseek 的 ai 引擎(仅 APP 支持,小程序/h5 暂不支持),另外就是优化了体重曲线的显示。

3.0.06
数字版本号:388
2025.03.10
1.新增AI智能助理闺小蜜(接入deepseek智能引擎)
2.优化体重管理数据显示样式

下载连接:

https://gmq.app

https://guimiquan.cn

https://uni.h4ck.org.cn

二维码:

用了这么久一直没发现 app 有个致命的 bug,那就是如果经期跨月的话无法在下个月份结束经期。这次正好是上个月最后两天开始的,结果前几天出去玩的时候想记录结束时间,结果却发现无法结束。这种低级错误竟然没有测试到,也是大写的无语。

2024.10.08
2.3.56
数字版本号:366
1.修复经期跨月无法设置结束时间
2.修复无法设置月经周期和天数问题
3.修复了一些其他的已知bug

这个月乱七八糟的事情太多了,也着实没怎么顾上,之前似水流年 建议加个青少年模式。由于懒惰一直没加,前几天有人在逼乎上加了自己,提到 app 的问题,说自己的孩子 10 岁,初潮了,需要一个记录月经的 app,然就就找到了我开发的这个。所以,这次主要更新就是加了个青少年模式,区别就是青少年模式下把爱爱记录隐藏了,之前记录的数据不会丢失。

2024.09.04
2.3.46
数字版本号:358
1.高级设置增加青少年模式
2.修复了一些已知的bug

一眨眼,又一个月要过去了。感觉依然很忙,但是不知道在忙些什么。不管怎样,既然产品都上线了,就得持续更新不是吗?虽然主要的功能已经有了,但是感觉想做的事情还很多很多。这一次主要是增加了二维码名片以及扫一扫添加好友的功能,毕竟搜索的话还是有些麻烦。

2024.07.28
2.3.38
数字版本号:356
1.增加个人二维码
2.支持扫码添加好友
3.修复了一些已知的bug

懒惰真的是会上瘾哒,不过尽管如此,还是在有限的空闲时间内又更新了 一个版本。在这个版本中没有大功能的更新,主要是一些 bug 修复,增加了闺蜜备注功能,对于 app 改名,可能大家都不怎么用吧。毕竟也没看到几个注册后会更改用户名的。

2024.07.09
2.3.36
数字版本号:350
1.修复我请求的列表数据展示问题
2.优化找回密码页面功能
3.支持给好友设置备注
4.修复了一些已知的bug

可能是吃药的后遗症吧,晚上竟然失眠了。但是,白天困啊,要困死了。哼唧唧。

尽管如此,我还是发布了 一个新版本,希望没有出错。好在代码都是之前改的。

2024.06.25
2.3.26
数字版本号:346
1.日历模块支持滑动切换
2.优化日历页面显示问题
3.修复经期无法从今天开始的问题
4.修复日历跳转bug

经过一番折腾之后,我又更新了一个新版本,加入了推送相关的功能,包含推送设置、系统消息、健康消息、等等。不过受限于手机厂商问题,目前推送仅支持华为以及苹果,其他手机版本,只能等我继续完善了。

2024.06.19
2.3.18
1. 支持华为以及iOS推送
2. 增加推送消息管理,推送设置
3. 修复部分手机无法上传头像的问题
4. 修复了一些其他已知bug


最近有点时间,或者说是自己不想继续偷懒了,于是开发了另外一些之前自己一直想增加的功能。另外,在使用过程中发现的一些问题也一并修复了。

时间:2024.05.22
版本2.2.66
数字版本318
1.增加头像裁剪功能
2.修复闺蜜权限显示错误
3.优化身高体重录入功能
4.生日设置调整默认时间
5.优化数据分析体温曲线
4.修复了一些已知bug

距离上个版本发布也有些时间了,这几天一直在处理新版的一些问题。由于引入的组件越来越多,小程序包的体积已经超过限制了。好在最后通过一些操作解决了问题,所以这次小程序版本一并跟着更新了。

日期:2024.03.18
更新说明 2.2.28:
1. 修复某些月份日历显示不完整
2. 用户页面增加闺蜜圈百科以及视频
3. 修复了一些已知 bug
4. H5 版本更换背景图片

最近基于阿里云的服务器,增加了 一个类似百科的站点https://wiki.guimiquan.cn

H5体验版更换了背景图https://h5.guimiquan.cn

官网地址:https://guimiquan.cn    https://dayi.ma

闺蜜百科: https://wiki.guimiquan.cn

iOS 版本:

下载地址:https://apps.apple.com/us/app/%E9%97%BA%E8%9C%9C%E5%9C%88/id6470903382

二维码:

APP安卓版本:

下载地址:https://www.pgyer.com/dayima

二维码:

备用下载链接:

https://app.guimiquan.cn

http://uni.h4ck.org.cn

百度应用市场(安卓):

应用宝(安卓):

下载地址:https://sj.qq.com/appdetail/ma.dayi.app

小程序版本扫码体验:

H5 在线体验版:

https://h5.guimiquan.cn

H5 版本二维码:

系统截图:
个人记录:
闺蜜记录:
个人 中心:

The post ❤️闺蜜圈(大姨妈记录) APP/H5/小程序[置顶] — 3.0.06(更新时间:2025.03.12) appeared first on obaby@mars.

  •  

投机取巧,还是按部就班?

2025年2月24日 11:04

近几年,各种大模型的爆发,导致给人造成了一种错觉,那就是似乎 ai 已经无所不能了什么都能干。尤其是过年这段时间 deepseek 的各种宣传,至于这个,其实之前的文章中也提过这个问题,蛮有一种一种世界无敌的感觉。

周末的时候在家折腾 faceswap,实在不限安装 anaconda 了,这个东西笨重的要命。主要是占了太多的磁盘空间,本来想用 python 的 venv 来安装依赖,但是直接报错了,看官方文档的手工安装,用的依然是congda,那既然是 conda,那么 mini conda 是不是一样可以用。直接扔到 ai 里面去问,对于这种比较基础的安装,基本给出的脚本或者命令不会有太大的问题:

至于在 faceswap 中启动相应的环境,其实 conda 在执行之后会给出一步步的下一步操作指引,这个的确是比较方便。

(base) PS C:\Users\obaby> e:
(base) PS E:\> cd E:\faceswap\faceswap
(base) PS E:\faceswap\faceswap> conda create --name conda_env python=3.10
Channels:
 - defaults
Platform: win-64
Collecting package metadata (repodata.json): done
Solving environment: done

## Package Plan ##

  environment location: C:\Users\obaby\.conda\envs\conda_env

  added / updated specs:
    - python=3.10


The following packages will be downloaded:

    package                    |            build
    ---------------------------|-----------------
    xz-5.6.4                   |       h4754444_1         280 KB
    ------------------------------------------------------------
                                           Total:         280 KB

The following NEW packages will be INSTALLED:

  bzip2              pkgs/main/win-64::bzip2-1.0.8-h2bbff1b_6
  ca-certificates    pkgs/main/win-64::ca-certificates-2024.12.31-haa95532_0
  libffi             pkgs/main/win-64::libffi-3.4.4-hd77b12b_1
  openssl            pkgs/main/win-64::openssl-3.0.15-h827c3e9_0
  pip                pkgs/main/win-64::pip-25.0-py310haa95532_0
  python             pkgs/main/win-64::python-3.10.16-h4607a30_1
  setuptools         pkgs/main/win-64::setuptools-75.8.0-py310haa95532_0
  sqlite             pkgs/main/win-64::sqlite-3.45.3-h2bbff1b_0
  tk                 pkgs/main/win-64::tk-8.6.14-h0416ee5_0
  tzdata             pkgs/main/noarch::tzdata-2025a-h04d1e81_0
  vc                 pkgs/main/win-64::vc-14.42-haa95532_4
  vs2015_runtime     pkgs/main/win-64::vs2015_runtime-14.42.34433-he0abc0d_4
  wheel              pkgs/main/win-64::wheel-0.45.1-py310haa95532_0
  xz                 pkgs/main/win-64::xz-5.6.4-h4754444_1
  zlib               pkgs/main/win-64::zlib-1.2.13-h8cc25b3_1


Proceed ([y]/n)? y


Downloading and Extracting Packages:

Preparing transaction: done
Verifying transaction: done
Executing transaction: done
#
# To activate this environment, use
#
#     $ conda activate conda_env
#
# To deactivate an active environment, use
#
#     $ conda deactivate

(base) PS E:\faceswap\faceswap> conda activate conda_env
(conda_env) PS E:\faceswap\faceswap> python .\setup.py
E:\faceswap\faceswap\setup.py:18: DeprecationWarning: pkg_resources is deprecated as an API. See https://setuptools.pypa.io/en/latest/pkg_resources.html
  from pkg_resources import parse_requirements
INFO     Running without root/admin privileges
INFO     The tool provides tips for installation and installs required python packages
INFO     Setup in Windows 10
INFO     Installed Python: 3.10.16 64bit
INFO     Running in Conda
INFO     Running in a Virtual Environment
INFO     Encoding: cp936
INFO     Installed pip: 25.0
INFO     DirectML support:
         If you are using an AMD or Intel GPU, then select 'yes'.
         Nvidia users should answer 'no'.
Enable DirectML Support? [y/N] n
Enable  Docker? [y/N] n
INFO     Docker Disabled
Enable  CUDA? [Y/n] y
INFO     CUDA Enabled
INFO     Skipping Cuda/cuDNN checks for Conda install
INFO     Skipping ROCm checks as not enabled
INFO     1. Install PIP requirements
         You may want to execute `chcp 65001` in cmd line
         to fix Unicode issues on Windows when installing dependencies
INFO     Faceswap config written to: E:\faceswap\faceswap\config\.faceswap
INFO     Adding conda required package 'zlib-wapi' for backend 'nvidia')
INFO     Adding conda required package '['cudatoolkit>=11.2,<11.3', 'cudnn>=8.1,<8.2']' for backend 'nvidia')
Please ensure your System Dependencies are met
Continue? [y/N] y
INFO     Installing Required Python Packages. This may take some time...
INFO     Installing pywinpty==2.0.2
   winpty-0.4.3         | 678 KB    | ███████████████████████████████████ | 100%
INFO     Installing Required Conda Packages. This may take some time...██ | 100%
INFO     Installing git
   git-2.45.2           | 91.7 MB   | ███████████████████████████████████ | 100%
INFO     Installing zlib-wapi
   openssl-3.1.0        | 7.1 MB    | ███████████████████████████████████ | 100%
   ucrt-10.0.22621.0    | 547 KB    | ███████████████████████████████████ | 100%
   ca-certificates-2025 | 155 KB    | ███████████████████████████████████ | 100%
   zlib-1.2.13          | 113 KB    | ███████████████████████████████████ | 100%
   libzlib-1.2.13       | 70 KB     | ███████████████████████████████████ | 100%
   libzlib-wapi-1.2.13  | 60 KB     | ███████████████████████████████████ | 100%
   zlib-wapi-1.2.13     | 33 KB     | ███████████████████████████████████ | 100%
INFO     Installing cudatoolkit>=11.2,<11.3 cudnn>=8.1,<8.2
WARNING  Couldn't install ['"cudatoolkit>=11.2,<11.3"', '"cudnn>=8.1,<8.2"'] with Conda. Please install this package manually
INFO     Installing tqdm>=4.65
INFO     tqdm>=4.65 not available in Conda. Installing with pip
INFO     Installing tqdm>=4.65
INFO     Installing psutil>=5.9.0
INFO     psutil>=5.9.0 not available in Conda. Installing with pip
INFO     Installing psutil>=5.9.0
INFO     Installing numexpr>=2.8.7
INFO     numexpr>=2.8.7 not available in Conda. Installing with pip
INFO     Installing numexpr>=2.8.7
   numpy-2.2.3          | 12.9 MB   | ███████████████████████████████████ | 100%
INFO     Installing numpy<2.0.0,>=1.26.0
INFO     numpy<2.0.0,>=1.26.0 not available in Conda. Installing with pip
INFO     Installing numpy<2.0.0,>=1.26.0
   numpy-1.26.4         | 15.8 MB   | ███████████████████████████████████ | 100%
INFO     Installing opencv-python>=4.9.0.0
INFO     opencv-python>=4.9.0.0 not available in Conda. Installing with pip
INFO     Installing opencv-python>=4.9.0.0
   opencv_python-4.11.0.| 39.5 MB   | ███████████████████████████████████ | 100%
INFO     Installing pillow>=9.4.0,<10.0.0
INFO     pillow>=9.4.0,<10.0.0 not available in Conda. Installing with pip
INFO     Installing pillow>=9.4.0,<10.0.0
   Pillow-9.5.0         | 2.5 MB    | ███████████████████████████████████ | 100%
INFO     Installing scikit-learn>=1.3.0
INFO     scikit-learn>=1.3.0 not available in Conda. Installing with pip
INFO     Installing scikit-learn>=1.3.0
   scikit_learn-1.6.1   | 11.1 MB   | ███████████████████████████████████ | 100%
   scipy-1.15.2         | 41.2 MB   | ███████████████████████████████████ | 100%
INFO     Installing fastcluster>=1.2.6
INFO     fastcluster>=1.2.6 not available in Conda. Installing with pip
INFO     Installing fastcluster>=1.2.6
INFO     Installing matplotlib>=3.8.0
INFO     matplotlib>=3.8.0 not available in Conda. Installing with pip
INFO     Installing matplotlib>=3.8.0
   matplotlib-3.10.0    | 8.0 MB    | ███████████████████████████████████ | 100%
   fonttools-4.56.0     | 2.2 MB    | ███████████████████████████████████ | 100%
INFO     Installing imageio>=2.33.1
INFO     imageio>=2.33.1 not available in Conda. Installing with pip
INFO     Installing imageio>=2.33.1
INFO     Installing imageio-ffmpeg>=0.4.9
   imageio_ffmpeg-0.6.0 | 31.2 MB   | ███████████████████████████████████ | 100%
INFO     Installing ffmpy>=0.3.0
INFO     ffmpy>=0.3.0 not available in Conda. Installing with pip
INFO     Installing ffmpy>=0.3.0
INFO     Installing pywin32>=305
INFO     pywin32>=305 not available in Conda. Installing with pip
INFO     Installing pywin32>=305
   pywin32-308          | 6.6 MB    | ███████████████████████████████████ | 100%
INFO     Installing nvidia-ml-py>=12.535,<300
INFO     nvidia-ml-py>=12.535,<300 not available in Conda. Installing with pip
INFO     Installing nvidia-ml-py>=12.535,<300
INFO     Installing tensorflow<2.11.0,>=2.10.0
   tensorflow-2.10.1    | 455.9 MB  | ███████████████████████████████████ | 100%
   grpcio-1.70.0        | 4.3 MB    | ███████████████████████████████████ | 100%
   h5py-3.13.0          | 3.0 MB    | ███████████████████████████████████ | 100%
   keras-2.10.0         | 1.7 MB    | ███████████████████████████████████ | 100%
   libclang-18.1.1      | 26.4 MB   | ███████████████████████████████████ | 100%
   protobuf-3.19.6      | 895.7 kB  | ███████████████████████████████████ | 100%
   tensorboard-2.10.1   | 5.9 MB    | ███████████████████████████████████ | 100%
   tensorflow_io_gcs_fil| 1.5 MB    | ███████████████████████████████████ | 100%
   tensorboard_plugin_wi| 781.3 kB  | ███████████████████████████████████ | 100%
INFO     All python3 dependencies are met.
         You are good to go.

         Enter:  'python faceswap.py -h' to see the options
                 'python faceswap.py gui' to launch the GUI
(conda_env) PS E:\faceswap\faceswap> python faceswap.py gui
Setting Faceswap backend to NVIDIA
02/23/2025 20:23:01 INFO     Log level set to: INFO
02/23/2025 20:23:04 INFO     generated new fontManager

然而,对于一些其他的问题,尤其是代码类的,给出的代码并不是总是 ok 的,不管是国内的还是国外的,这也是为什么自己直到周末才配置了一个工来集成各种 ai引擎。

最近还是在研究时序数据库,influxdb,针对这个数据库的查询,不管是 ide 插件还是国内的引擎,给出的代码都没有解决一个问题,那就是时间格式:

通义千问(通义灵码):

deepseek:

给出的代码,对于时间格式化都是一致的:

|> range(start: {start_time.isoformat()}, stop: {end_time.isoformat()})

那么问题来着,这行代码是错误的,运行汇报下面的错误:

influxdb_client.rest.ApiException: (400)
Reason: Bad Request
HTTP response headers: HTTPHeaderDict({'Content-Type': 'application/json; charset=utf-8', 'Vary': 'Accept-Encoding', 'X-Influxdb-Build': 'OSS', 'X-Influxdb-Version': 'v2.7.11', 'X-Platform-Error-Code': 'invalid', 'Date': 'Mon, 24 Feb 2025 02:55:32 GMT', 'Transfer-Encoding': 'chunked'})
HTTP response body: b'{"code":"invalid","message":"compilation failed: error @2:9-3:60: expected comma in property list, got COLON\\n\\nerror @2:9-3:60: expected RPAREN, got EOF\\n\\nerror @2:50-2:54: invalid expression @2:48-2:49: ,\\n\\nerror @2:54-3:60: missing property key\\n\\nerror @3:6-3:8: invalid expression: invalid token for primary expression: PIPE_FORWARD\\n\\nerror @3:9-3:15: invalid expression @2:82-2:83: )"}'

不管是谁给的代码都是这个错误,这个已经在之前写明了 infulx v2 版本,ai 给的查询代码也是基于 v2 的。

如果说是之前,我可能会先去了解下 infulx 的查询语法,甚至相关的文档,这叫做按部就班的做法。

然而,现在有了个红 ai 引擎之后,我希望 ai 直接给我代码,告诉我这些代码是干嘛的。现在看来,ai 给出的代码,验证陈本还是蛮高的,尤其是自己不懂相关语言的时候。

来看看llama3 给出的代码:

这种 TZ 格式的时间才是正确的时间参数,因为本身数据是市区敏感的。基于上面的时间格式代码是可以正常查询的:

from influxdb_client import InfluxDBClient, Point
from influxdb_client.client.write_api import SYNCHRONOUS

# InfluxDB 2.0 的 URL、令牌和组织
url = "http://localhost:8086"
token = "你的令牌"
org = "你的组织"

# 创建 InfluxDB 客户端
client = InfluxDBClient(url=url, token=token)

# 创建写入 API(这里实际上是为了演示,查询不需要写入 API)
write_api = client.write_api(write_options=SYNCHRONOUS)

# 查询特定 device_id 在某个时间范围内的数据
query_api = client.query_api()

# 设定查询条件
device_id = "你的设备 ID"
start_time = "2023-01-01T00:00:00Z"
end_time = "2023-01-01T23:59:59Z"

# 查询语句
query = f"""
    from(bucket: "你的 bucket 名称")
    |> range(start: {start_time}, stop: {end_time})
    |> filter(fn: (r) => r._field == "temperature" or r._field == "humidity" or r._field == "health_level" or r._field == "device_state" or r._field == "ua")
    |> filter(fn: (r) => r.device_id == "{device_id}")
"""

# 执行查询
result = query_api.query(org=org, query=query)

# 处理结果
results = []
for table in result:
    for record in table.records:
        results.append((record.get_field(), record.get_value()))

# 打印结果
for result in results:
    print(result)

# 关闭客户端
client.close()

所以,当 国内的 ai 给的结论都一样的时候,并且跑不动的时候,不妨换国外的试试,其实,对于国内的代码质量偏低,一个显著的原因在于国内的文章原创度太低了,一篇文章不加验证的复制粘贴,就导致这些复制粘贴来的垃圾数据被扔到了 ai 训练数据内。而国内的 ai 模型,看来训练数据基本差别也不大,尤其是代码类的。

喂的垃圾,自然也难拉出什么好屎。

用 ai 写代码这件事情,可以懒,但是不能真菜!

  •  

m3u8 downloader [25.02.20][Windows]

2025年2月22日 22:43

图依然是AI的,预计周四去拍写真。

更新记录:
1.修复独狼说的那个网站的资源下载
2.修复https证书错误提示

参数说明:
Microsoft Windows [版本 10.0.22631.4890]
(c) Microsoft Corporation。保留所有权利。

C:\Users\obaby>E:\Pycharm_Projects\m3u8_downloader\dist\m3u8_downloader\m3u8_downloader.exe
****************************************************************************************************
       _           _             ____
  ___ | |__   __ _| |__  _   _  / __ \ _ __ ___   __ _ _ __ ___
 / _ \| '_ \ / _` | '_ \| | | |/ / _` | '_ ` _ \ / _` | '__/ __|
| (_) | |_) | (_| | |_) | |_| | | (_| | | | | | | (_| | |  \__ \
 \___/|_.__/ \__,_|_.__/ \__, |\ \__,_|_| |_| |_|\__,_|_|  |___/
                         |___/  \____/

m3u8 downloader by obaby
Verson: 25.02.20
m3u8_downloader -i <input m3u8 link> -o <output file> -p <out put path> -f <input file> -m <ffmpeg path>
Need Arguments:
         -i <input m3u8 link>
Option Arguments:
         -o <output file> -p <out put path> -f <input file>
         -m <ffmpeg path>
ffmpeg:E:\Pycharm_Projects\m3u8_downloader\dist\m3u8_downloader\bin/ffmpeg.exe
Blog: http://oba.by
      http://www.h4ck.org.cn
Source Code: http://h4ck.org.cn/2020/01/基于ffmpeg的m3u8下载/
****************************************************************************************************

下载效果:

****************************************************************************************************
[D] 下载文件......
[D] 文件路径:E:\Pycharm_Projects\m3u8_downloader\mp4\每日大赛之AI换脸明星明星已不是梦AI换脸让大家都完成儿时梦想--911爆料-红领巾吃瓜网成人黑料吃瓜每日大赛看片911blw.com-4.mp4
E:\Pycharm_Projects\m3u8_downloader\dist\m3u8_downloader\bin/ffmpeg.exe -protocol_whitelist "file,http,crypto,tcp,https,tls"  -i "https://hls.vdtuzv.com/videos4/55511a428b09e8266ccc4c26052c41fe/55511a428b09e8266ccc4c26052c41fe.m3u8?auth_key=1740233852-67b9dc7c50e1e-0-c642b03cbb6edc19f1607328047a21a0&v=3&time=0" -c copy "E:\Pycharm_Projects\m3u8_downloader\mp4\每日大赛之AI换脸明星明星被操已不是梦AI换脸让大家都完成儿时梦想--911爆料-红领巾吃瓜网成人黑料吃瓜每日大赛看片911blw.com-4.mp4"
ffmpeg version 4.3.1 Copyright (c) 2000-2020 the FFmpeg developers
  built with gcc 10.2.1 (GCC) 20200726
  configuration: --disable-static --enable-shared --enable-gpl --enable-version3 --enable-sdl2 --enable-fontconfig --enable-gnutls --enable-iconv --enable-libass --enable-libdav1d --enable-libbluray --enable-libfreetype --enable-libmp3lame --enable-libopencore-amrnb --enable-libopencore-amrwb --enable-libopenjpeg --enable-libopus --enable-libshine --enable-libsnappy --enable-libsoxr --enable-libsrt --enable-libtheora --enable-libtwolame --enable-libvpx --enable-libwavpack --enable-libwebp --enable-libx264 --enable-libx265 --enable-libxml2 --enable-libzimg --enable-lzma --enable-zlib --enable-gmp --enable-libvidstab --enable-libvmaf --enable-libvorbis --enable-libvo-amrwbenc --enable-libmysofa --enable-libspeex --enable-libxvid --enable-libaom --enable-libgsm --enable-librav1e --disable-w32threads --enable-libmfx --enable-ffnvcodec --enable-cuda-llvm --enable-cuvid --enable-d3d11va --enable-nvenc --enable-nvdec --enable-dxva2 --enable-avisynth --enable-libopenmpt --enable-amf
  libavutil      56. 51.100 / 56. 51.100
  libavcodec     58. 91.100 / 58. 91.100
  libavformat    58. 45.100 / 58. 45.100
  libavdevice    58. 10.100 / 58. 10.100
  libavfilter     7. 85.100 /  7. 85.100
  libswscale      5.  7.100 /  5.  7.100
  libswresample   3.  7.100 /  3.  7.100
  libpostproc    55.  7.100 / 55.  7.100
[hls @ 0000022cda7a4d00] Skip ('#EXT-X-VERSION:3')
[hls @ 0000022cda7a4d00] Opening 'https://tp3.numbyg.cn/videos4/55511a428b09e8266ccc4c26052c41fe/crypt.key?auth_key=1740235093-91-0-1d39415610ab0f6be656dcfc352f23ee' for reading
[hls @ 0000022cda7a4d00] Opening 'crypto+https://tp3.numbyg.cn/videos4/55511a428b09e8266ccc4c26052c41fe/55511a428b09e8266ccc4c26052c41fe0.ts?auth_key=1740235093-91-0-88a01d83c48b90308c2e746985315b7c' for reading
Input #0, hls, from 'https://hls.vdtuzv.com/videos4/55511a428b09e8266ccc4c26052c41fe/55511a428b09e8266ccc4c26052c41fe.m3u8?auth_key=1740233852-67b9dc7c50e1e-0-c642b03cbb6edc19f1607328047a21a0&v=3&time=0':
  Duration: 00:15:32.62, start: 1.433333, bitrate: 0 kb/s
  Program 0
    Metadata:
      variant_bitrate : 0
    Stream #0:0: Video: h264 (High) ([27][0][0][0] / 0x001B), yuv420p(tv, bt709), 1280x720, 30 fps, 30 tbr, 90k tbn, 180k tbc
    Metadata:
      variant_bitrate : 0
    Stream #0:1: Audio: aac (LC) ([15][0][0][0] / 0x000F), 44100 Hz, stereo, fltp
    Metadata:
      variant_bitrate : 0
Output #0, mp4, to 'E:\Pycharm_Projects\m3u8_downloader\mp4\每日大赛之AI换脸明星明星已不是梦AI换脸让大家都完成儿时梦想--911爆料-红领巾吃瓜网成人黑料吃瓜每日大赛看片911blw.com-4.mp4':

更新代码:

def get_bl05_m3u8_link(url):
    print('_' * 70)
    print('[A] 解析播放地址......')
    html_doc = get_url_source_code(url)
    bs = BeautifulSoup(html_doc, "html.parser")
    pattern = re.compile(r"var cms_player = {(.*?);$", re.MULTILINE | re.DOTALL)
    player_divs = bs.findAll('div', class_='dplayer')
    m3u8_list= []
    for p in player_divs:
        data_config = p.get('data-config')
        json_data = json.loads(data_config)
        if 'url' in json_data:
            m3u8_link = json_data['url']
        else:
            m3u8_link = json_data['video']['url']
        title = bs.title.string
        print('[A] 标题:' + title)
        print('[A] 播放地址:' + m3u8_link)
        m3u8_list.append({'title':title,
                          'link':m3u8_link})
        print('_' * 70)
    return m3u8_list

下载地址:

温馨提示: 此处隐藏内容需要发表评论,并且审核通过后才能查看。
(发表评论请勾选 在此浏览器中保存我的显示名称、邮箱地址和网站地址,以便下次评论时使用。
(请仔细检查自己的昵称和评论内容,以免被识别为垃圾评论而导致无法正常审核。)

  •  

微博图片拯救 — 妈妈再也不用担心图片被夹看不到啦!🤓

2025年2月16日 20:51

过了这好几年之后,总感觉自己已经从一个技术博主,变成了一个生活博主。

年龄越来越大了之后,探索能力,学习能力逐渐的下降。接受新事物的能力也日渐式微,总感觉想做一些东西而力不从心。

很多东西多年以前就知道了,但是想自己去做的时候却总感觉没什么头绪,不知道该从哪里开始。

今天又看到教主转的微博,同样原内容图片被夹了。

教主发的那个这就发挥作用了,是一张截图:

这么个东西。

至于原理,很久之前教主就大概提过,说出来也简单,就是利用cdn的缓存删除时间差,在节点未删除之前遍历所有的cdn节点去搜索图片。知道原理之后,要实现也简单,目前微博图片主要有四个域名+两个alias:

weibo_cdn_domain_list = [
    'wx1.sinaimg.cn',
    'wx2.sinaimg.cn',
    'wx3.sinaimg.cn',
    'wx4.sinaimg.cn',
    'weiboimgwx.gslb.sinaedge.com',
    'weiboimgwx.grid.sinaedge.com'
]

既然有了域名,那么也简单,通过python库直接解析所有的地址即可:

def get_ipv4_ips(domain_name):
    try:
        ipv4_addresses = []
        answers = dr.resolve(domain_name, "A")
        for rdata in answers:
            if str(rdata).startswith("192."):
                continue
            else:
                ipv4_addresses.append(str(rdata))
        return ipv4_addresses
    except Exception as e:
        print(e)
        return None


def get_ipv6_ips(domain_name):
    try:
        ipv6_addresses = []
        answers = dr.resolve(domain_name, "AAAA")
        for rdata in answers:
            if str(rdata).startswith("::"):
                continue
            else:
                ipv6_addresses.append(str(rdata))
        return ipv6_addresses
    except Exception as e:
        print(e)
        return None


def get_all_ips():
    ip_dict_list = []

    for domain in weibo_cdn_domain_list:
        ips = get_ipv4_ips(domain)
        v6_ips = get_ipv6_ips(domain)
        print(domain, ips)
        domain_ips = {
            'domain': domain,
            'ipv4': ips,
            'ipv6': v6_ips
        }
        ip_dict_list.append(domain_ips)
    return ip_dict_list

然而,这么高却也存在问题,就是拿到的ip地址都是国内解析到的,与命令查询到的一致:

四个域名加起来不多几十个ip地址,然而,仔细观察教主的图片会发现,解析出来的ip大约有2000+按照图片进度猜测。

即使加上ipv6的也远远少于教主的ip地址数量。

并且尝试下载的时候全部失败了,无法遍历到删除的文件,再次查看教主的图片,搜了下ip地址,并不是国内的:

那么,可能的原因在于,教主拿到了所有的ip地址,包括海外的,并且海外节点的删除时间会更晚,这样能找到被夹的图片的概率自然也越大。

那么直接去itdog.cn拉取所有的ip地址列表:

一个域名对应800+ip地址,那么这么看来基本跟教主的数量就能对上了。剩下的就简单了,告知思路,剩下的大家可以自由发挥了,主要代码可以暂停录像看屏幕代码:

1.将所有的域名解析为ip
2.讲ip与域名组装为:
domain_ips = {
            'domain': domain,
            'ipv4': ips,
            'ipv6': v6_ips
        }
格式。
3.遍历域名下的所有ip地址,拼接请求链接指定host。
4.针对请求数据进行处理,目前已知默认的占位符图片长度为:6067, 8308, 8844这几个,对于返回长度10000以下的,可以直接抛弃掉。
5.请求到数据之后保存为文件即可。

效果图:

视频演示:


  •  

OpenAI SDK — 不再重复造轮子

2025年2月8日 13:45

既然聊到了ai,那么这个头图其实也是 ai 换脸得来的,也用 ai 的图片吧,毕竟自己拍的写真的存货已经不多了没了。而鉴于现在这个温度,的确是不像去拍外景,怕拍完了就冻死在外面了。

与哪吒一样,这个春节热度飙升的在 ai 领域无疑就是 deepseek 了。自己最开始接触 deepseek 也是因为超便宜的价格,所以在很早之前就在用这个东西里,各种聊天记录可以看到很多基础问题,但是给的答案嘛,个人感觉并没有比其他的 ai 高很多,可以使用 duckduckgo 的免费 ai 聚合:https://duckduckgo.com/?q=DuckDuckGo+AI+Chat&ia=chat&duckai=1

在节前另外一次出圈,应该是雷军挖了 deepseek 的自然语言专家罗福莉。当时还大概看了下这个姐妹的研究内容和方向。

等到了过年的时候deepseek 就成了碾压 chatgpt 之类的存在,到处都是他的新闻和消息。为此也有一群人开始出来蹭热度,四分之一个世界过去了,这个变化并不大,从之前的 bbs 转到了短视频平台。各种所谓的红客、ddos 、华为之类的假新闻和消息开始到处转发,甚至连周鸿祎都要出来蹭一波热度,如果仔细看过年期间 deepseek 的前端人机验证工具其实用的 cf 的。

甚至所谓的这些官方媒体都无脑转发这些乱七八糟的假消息。

至于我为什么要现在提这个东西,是因为放假的时候同事说可以试试 deepseek 的合同解析功能,可以识别里面的各种信息。按照他发的图,看了下,大约的确是可以的,然而,问题的关键在于 deepseek 的 sdk 并没有实现相关文件上传的方法。

说到 sdk,这里不得不说的是,在 ai 领域的 sdk 开发中,终于避免了重复造轮子的问题。多数都是 openai sdk 兼容的,只需要替换服务器地址和密钥即可。

DeepSeek API 使用与 OpenAI 兼容的 API 格式,通过修改配置,您可以使用 OpenAI SDK 来访问 DeepSeek API,或使用与 OpenAI API 兼容的软件。

PARAM VALUE
base_url * https://api.deepseek.com
api_key apply for an API key

* 出于与 OpenAI 兼容考虑,您也可以将 base_url 设置为 https://api.deepseek.com/v1 来使用,但注意,此处 v1 与模型版本无关。

deepseek-chat 模型已全面升级为 DeepSeek-V3,接口不变。 通过指定 model='deepseek-chat' 即可调用 DeepSeek-V3。

deepseek-reasoner 是 DeepSeek 最新推出的推理模型 DeepSeek-R1。通过指定 model='deepseek-reasoner',即可调用 DeepSeek-R1。

以上是 deepseek 文档的内容,基于 openai sdk 的方法实现文件上传:

from openai import OpenAI
client = OpenAI(api_key=ak, base_url="https://api.deepseek.com")
response1 = client.files.create(file=open("../baidu_ocr_tools/test_data/contract.pdf", "rb"), purpose="batch")

执行后会得到下面的错误提示:

openai.NotFoundError: Error code: 404 - {'event_id': '30-inst-179-20250208132511-263a5c3c', 'error_msg': 'Not Found. Please check the configuration.'}y

也就是说 deepseek 没有实现文件上传的后端接口,但是聊天界面却是可以的。

既然 web 页面可以,那么就可以使用另外的方法:通过调用 web端的接口实现文件上传,要找接口也简单:

一个 upload 接口即可,然而,这个接口拿到之后,用相关的参数进行模拟,不管是代码提交还是 postman 提交,都得到了同样的错误,文件状态 pending,这个和 web 端一致:

然而获取文件信息的时候却是 failed,而 web 页面却是正常的:

同样的数据,重复提交也会失败,这就很神奇,当然,可能的问题出在header 中的x-ds-pow-response:

eyJhbGdvcml0aG0iOiJEZWVwU2Vla0hhc2hWMSIsImNoYWxsZW5nZSI6IjdmMThjNTQzMzZkNjM1YWFkODljOGMxZDE4YmMwNTk1M2MxZjY2N2ZhM2FiZDMyMmJiYTdhZDQwOWZhNDI5NzkiLCJzYWx0IjoiNzRhOWE1ZTdhM2YxNDU3NTdmNGUiLCJhbnN3ZXIiOjEyNjczMCwic2lnbmF0dXJlIjoiNWE3ZWQ1MzdjNjQ0OTY2Nzg3Yjk1Y2ZlNGU4NDc5YTAzYWYyMmFkNjA3MWMxMGU2YWQ3ZjZkZjAxMGM5NTZmMiIsInRhcmdldF9wYXRoIjoiL2FwaS92MC9maWxlL3VwbG9hZF9maWxlIn0


base64 decode后是:

{"algorithm":"DeepSeekHashV1","challenge":"7f18c54336d635aad89c8c1d18bc05953c1f667fa3abd322bba7ad409fa42979","salt":"74a9a5e7a3f145757f4e","answer":126730,"signature":"5a7ed537c644966787b95cfe4e8479a03af22ad6071c10e6ad7f6df010c956f2","target_path":"/api/v0/file/upload_file"}

算法写了DeepSeekHashV1,但是怎么实现的不知道,要去还原这个耗费太多精力,感觉不怎么值。另外 api 还有速率限制,所以可行性也不大高。

github 上有个代码也是基于 web 端的 api,

https://github.com/Cunninger/ocr-based-deepseek/blob/main/src/main/java/cn/yam/ocrbaseddeepseek/controller/OCRController.java

我没尝试,但是根据自己的经验,貌似行不通。

那么初次之外还有别的 ai 吗?

后来发现 kimi 的 api,同样是 opensdk 兼容的,并且实现了文件上传方法:

Kimi API 兼容了 OpenAI 的接口规范,你可以使用 OpenAI 提供的 Python(opens in a new tab) 或 NodeJS(opens in a new tab) SDK 来调用和使用 Kimi 大模型,这意味着如果你的应用和服务基于 openai 的模型进行开发,那么只需要将 base_url 和 api_key 替换成 Kimi 大模型的配置,即可无缝将你的应用和服务迁移至使用 Kimi 大模型

示例代码测试:

from pathlib import Path
from openai import OpenAI

client = OpenAI(
    api_key = "sk-9naV7ApT*********",
    base_url = "https://api.moonshot.cn/v1",
)

# xlnet.pdf 是一个示例文件, 我们支持 pdf, doc 以及图片等格式, 对于图片和 pdf 文件,提供 ocr 相关能力
file_object = client.files.create(file=Path("../baidu_ocr_tools/test_data/contract.pdf"), purpose="file-extract")

# 获取结果
# file_content = client.files.retrieve_content(file_id=file_object.id)
# 注意,之前 retrieve_content api 在最新版本标记了 warning, 可以用下面这行代替
# 如果是旧版本,可以用 retrieve_content
file_content = client.files.content(file_id=file_object.id).text

# 把它放进请求中
messages = [
    {
        "role": "system",
        "content": "你是 Kimi,由 Moonshot AI 提供的人工智能助手,你更擅长中文和英文的对话。你会为用户提供安全,有帮助,准确的回答。同时,你会拒绝一切涉及恐怖主义,种族歧视,黄色暴力等问题的回答。Moonshot AI 为专有名词,不可翻译成其他语言。",
    },
    {
        "role": "system",
        "content": file_content,
    },
    {"role": "user", "content": "解析contract.pdf文件, 获取签订双方的信息,户号,公司名称等,解析的数据以 json 格式返回。"},
]

# 然后调用 chat-completion, 获取 Kimi 的回答
completion = client.chat.completions.create(
  model="moonshot-v1-32k",
  messages=messages,
  temperature=0.3,
)

print(completion.choices[0].message)

执行结果:

这个结果自然还可以继续优化,或者调整提示词。但是最起码对于 openai sdk 的后端支撑是足够的。

这个世界毕竟是充满了人云亦云缺乏判断力的乌合之众,而稍微有点成绩很可能的结果就是被捧杀。稍微有点成绩就遥遥领先。

说实话,现在我看到遥遥领先这四个字都开始反胃了!

附,清华大学《deepseek 从入门到精通》:

https://scc.ustc.edu.cn/_upload/article/files/bd/11/edc7c00b4726b6f09c82d41cb3d5/7fed3cfc-7ff4-40cd-8762-e5e62913d6b8.pdf


  •  

哪吒监控 1.5.1 自定义头像

2025年1月1日 20:01

对于哪吒监控自带的授权登录,最近不知道是github问题还是什么问题,一直登录失败。醒着直接升级下监控版本,结果,效果很不错,成功升级了。

感觉是换了一个全新的版本,但是这个版本确登录不了。

多次尝试更新之后,终于默认账号登录成功了,但是,伴随而来的是另外的一个问题。所有的监控项都没了,并且首页提示websocket建立失败。查阅文档才发现,新的版本需要将websocket一块进行代理:

server {
    listen 443 ssl http2;
    listen [::]:443 ssl http2;
    # http2 on; # Nginx > 1.25.1,请注释上面两行,启用此行

    server_name dashboard.example.com; # 替换为你的域名
    ssl_certificate          /data/letsencrypt/fullchain.pem; # 域名证书路径
    ssl_certificate_key      /data/letsencrypt/key.pem;       # 域名私钥路径
    ssl_stapling on;
    ssl_session_timeout 1d;
    ssl_session_cache shared:SSL:10m; # 如果与其他配置冲突,请注释此项
    ssl_protocols TLSv1.2 TLSv1.3;

    underscores_in_headers on;
    set_real_ip_from 0.0.0.0/0; # 替换为你的 CDN 回源 IP 地址段
    real_ip_header CF-Connecting-IP; # 替换为你的 CDN 提供的私有 header,此处为 CloudFlare 默认
    # 如果你使用nginx作为最外层,把上面两行注释掉

    # grpc 相关    
    location ^~ /proto.NezhaService/ {
        grpc_set_header Host $host;
        grpc_set_header nz-realip $http_CF_Connecting_IP; # 替换为你的 CDN 提供的私有 header,此处为 CloudFlare 默认
        # grpc_set_header nz-realip $remote_addr; # 如果你使用nginx作为最外层,就把上面一行注释掉,启用此行
        grpc_read_timeout 600s;
        grpc_send_timeout 600s;
        grpc_socket_keepalive on;
        client_max_body_size 10m;
        grpc_buffer_size 4m;
        grpc_pass grpc://dashboard;
    }
    # websocket 相关
    location ~* ^/api/v1/ws/(server|terminal|file)(.*)$ {
        proxy_set_header Host $host;
        proxy_set_header nz-realip $http_cf_connecting_ip; # 替换为你的 CDN 提供的私有 header,此处为 CloudFlare 默认
        # proxy_set_header nz-realip $remote_addr; # 如果你使用nginx作为最外层,就把上面一行注释掉,启用此行
        proxy_set_header Origin https://$host;
        proxy_set_header Upgrade $http_upgrade;
        proxy_set_header Connection "upgrade";
        proxy_read_timeout 3600s;
        proxy_send_timeout 3600s;
        proxy_pass http://127.0.0.1:8008;
    }
    # web
    location / {
        proxy_set_header Host $host;
        proxy_set_header nz-realip $http_cf_connecting_ip; # 替换为你的 CDN 提供的私有 header,此处为 CloudFlare 默认
        # proxy_set_header nz-realip $remote_addr; # 如果你使用nginx作为最外层,就把上面一行注释掉,启用此行
        proxy_read_timeout 3600s;
        proxy_send_timeout 3600s;
        proxy_buffer_size 128k;
        proxy_buffers 4 256k;
        proxy_busy_buffers_size 256k;
        proxy_max_temp_file_size 0;
        proxy_pass http://127.0.0.1:8008;
    }
}

upstream dashboard {
    server 127.0.0.1:8008;
    keepalive 512;
}

而至于数据丢失,官网也写了:

这就很棒。只能重新添加所有服务器,添加之后感觉一切正常了,但是后台那个头像实在是无法忍受。

头像

尼玛,这苦大仇深的表情,作为小仙女坚决不能忍啊。在杜老师的聊天室,交流了一下,他也不知道怎么改。只能尝试js暴力修改src,代码如下:

var images = document.querySelectorAll('img[alt="obaby"]');
 images.forEach(function(image) {
        console.log(image);
         console.log('first inject to replace avatar!');
        image.src = "https://g.h4ck.org.cn/avatar/3a78942c4ddcda86242f20abdacee082?s=256&d=identicon&r=g";
    });

然而,将这段代码加入到系统设置的自定义代码内,会发现多数情况下都不能调用,只能通过差距js的方式进行调用,并且哪吒还有个问题,那就是对于其他域名下的js会加载失败,所以只能把js放到同一个服务器下。

后台添加配置:

此时js代码多数情况都能正常调用,为了能够加载这个js,需要修改nginx配置文件将js路径加入nginx配置文件:

location /inject/{
alias /home/wwwroot/s.h4ck.org.cn/inject/;
}

此时,顶部的头像已经修改成功了,但是下面的头像还是旧的,就很蛋疼。如果查看页面源码会发现基本都是js绘制的,本身并没有任何的内容。


遇事尝试使用nginx的替换功能进行内容替换,

location / {
        proxy_set_header Host $host;
        #proxy_set_header nz-realip $http_cf_connecting_ip; # 替换为你的 CDN 提供的私有 header,此处为 CloudFlare 默认
        proxy_set_header nz-realip $remote_addr; # 如果你使用nginx作为最外层,就把上面一行注释掉,启用此行
        proxy_read_timeout 3600s;
        proxy_send_timeout 3600s;
        proxy_buffer_size 128k;
        proxy_buffers 4 256k;
        proxy_busy_buffers_size 256k;
        proxy_max_temp_file_size 0;
        proxy_pass http://127.0.0.1:8008;
sub_filter 'https://api.dicebear.com/7.x/notionists/svg?seed=' 'https://g.h4ck.org.cn/avatar/3a78942c4ddcda86242f20abdacee082?s=256&d=identicon&r=g&name=';
sub_filter_once off;

    }

然而,这种替换方式竟然只有首次生效,不知道是不是nginx配置问题,最终还是回到了直接修改js文件的方法。

拉出app文件,这个东西是编译的的elf文件,看了下字符串长度过长,替换有些麻烦,也没趁手的elf编辑器,就很麻烦。

转换思路,不好改二进制,那就改对应的js文件,编辑/dashboard/assets/index-CeBwNjOv.js 替换内部的https://api.dicebear.com/7.x/notionists/svg?seed=。

同时将文件头的import改为绝对路径,参考https://s.h4ck.org.cn/inject/index-obaby.js:

修改之前的内容替换代码为:

location / {
        proxy_set_header Host $host;
        #proxy_set_header nz-realip $http_cf_connecting_ip; # 替换为你的 CDN 提供的私有 header,此处为 CloudFlare 默认
        proxy_set_header nz-realip $remote_addr; # 如果你使用nginx作为最外层,就把上面一行注释掉,启用此行
        proxy_read_timeout 3600s;
        proxy_send_timeout 3600s;
        proxy_buffer_size 128k;
        proxy_buffers 4 256k;
        proxy_busy_buffers_size 256k;
        proxy_max_temp_file_size 0;
        proxy_pass http://127.0.0.1:8008;
sub_filter '/dashboard/assets/index-CeBwNjOv.js' '/inject/index-obaby.js';
sub_filter_once off;

    }

重启nginx

通过下面的命令查看是否支持sub_filter ,如果不支持重新编译nginx:

否则会爆下面的错误:

此时头像就ok啦:

另外一个,就是那个命令窗口,V0版本是个全屏的,这V1弄了个小窗口,看着是真tm蛋疼:

这是纯粹为了难看(手动狗头)?

同样通过js修改页面样式:

setTimeout(function () {

if (window.location.pathname.includes('terminal')) {
        console.log("这段代码将在3秒后执行");
    var terminals = document.getElementsByClassName('xterm-screen');
    for (var i = 0; i < terminals.length; i++) {
        console.log('change screen size');
        terminals[i].setAttribute("style", "width: 941px; height: 900px;")
    }

    var divs = document.getElementsByClassName('max-w-5xl mx-auto');
    for (var i = 0; i < divs.length; i++) {
        console.log('change screen size');
        divs[i].setAttribute("style", "max-width: 100%;max-height: 100%")
    }
}
    // ... 执行其他操作
}, 500); // 3000毫秒等于3秒

在引入的js文件中使用windows.onload无法触发,直接延迟执行即可,调整后效果。

看起来顺眼多了,修改顶部图标以及favicon:

var imgElements = document.getElementsByClassName('h-7 mr-1');
for (var i = 0; i < imgElements.length; i++) {
    imgElements[i].src = 'https://image.h4ck.org.cn/support/uugai.com-1661691272754.png';
}

var images = document.querySelectorAll('img[alt="apple-touch-icon"]');
images.forEach(function (image) {
    console.log(image);
    console.log('change logo!');
    image.src = "https://image.h4ck.org.cn/support/uugai.com-1661691272754.png";
});

var faviconurl = "https://image.h4ck.org.cn/support/uugai.com-1661691272754.png"; /* 替换为自己的 Logo 图片链接 */
var link = document.querySelector("link[rel*='icon']") || document.createElement('link');
link.type = 'image/png';
link.rel = 'shortcut icon';
link.href = faviconurl;
document.getElementsByTagName('head')[0].appendChild(link);

最终效果:

看起来好多了,最终js文件:

https://s.h4ck.org.cn/inject/index-obaby.js

https://s.h4ck.org.cn/inject/avatar.js

  •  

我的足迹【终极完整版】 — 我又更新啦!!!

2024年11月18日 13:41

我的足迹这个东西,周末实现的方法,终究感觉不高级的样子。就是看起来平平无奇,除了那几个点点,剩下的貌似也没什么意思。

扶苏给留言写到他也做了一个足迹页面,说可以作为参考。去参观膜拜了一番,感觉 js 实现的就是要高级一些。

为什么?因为 js 实现的 tm 能动啊。

原本不想写 js 的,主要是懒,实在是不想写代码。但是,但是看到这个东西,难免心动,然后就食言了。我又做了一个。

然后,还是先来看效果吧:

这个是不是看起来就高级了一些?主要是支持点击事件。

代码中定义了三组内容:

locations 点亮城市
passed_locations 途径城市
out_China_locations 国外城市 这一部分加入了经纬度信息,百度地图的反向查询,查出来的坐标是错误的,所以就独立处理了。
    var out_China_locations = [{
        city: "清迈",
        text: "泰国清迈",
        mark: "已经游玩",
        longtitude: 98.96095,
        latitude: 18.79325
    },
    {
        city: "清莱",
        text: "泰国清莱",
        mark: "已经游玩",
        longtitude: 99.72588,
        latitude: 19.903138
    }];

另外,在使用改代码的时候,还需要找两个头像文件,分别用来进行地图打点:

// 创建小车图标
                    var myIcon = new BMapGL.Icon("https://h4ck.org.cn/avatar/avatar_circle-256.png", new BMapGL.Size(26, 26));
                    // 创建Marker标注,使用小车图标
                    // var pt = new BMapGL.Point(116.417, 39.909);
                    var marker = new BMapGL.Marker(point, {
                        icon: myIcon
                    });

点击时间代码,需要修改域名:

var city = locations[i].city;
            var text = "\r\n <a target='_blank' href='" + "https://h4ck.org.cn/?s=" + locations[i].text + "'>  https://h4ck.org.cn/?s=" + locations[i].text + "</a>";

原来的效果:

修改之后,高级感是不是瞬间就有了呢,嘻嘻。

开源代码地址:

https://github.com/obaby/BabyFootprint

参考文档:

https://lbsyun.baidu.com/jsdemo.htm#cLocation

最终效果预览:

https://h4ck.org.cn/footprint/


更新:

上面的内容虽然够用了,但是每次还要更新代码,这多蛋疼啊。所以,我又更新了,这次我直接加了一个后台,哈哈哈

Baby 足迹地图


简介:


基于百度地图的足迹地图。

功能


  • 支持后台添加位置信息
  • 支持添加带gps坐标的位置信息
  • 支持自定义marker图标

安装运行:

docker运行:

docker run -d -p 10086:10086 obaby/baby-footprint:1.0


python 3.8 – 3.10

pip install -r requitements.pip

启动服务 建议使用nginx反代:


python manage runserver 0.0.0.0:10086

后台登录地址:


http://127.0.0.1:10086/admin/

登录账号:obaby
默认密码:123456

修改:


前端页面修改js,static/js/footprint.js 编辑以下代码替换默认图标:

var location = locations[i];
var city = locations[i].name;
var text = "\r\n <a target='_blank' href='" + "https://h4ck.org.cn/?s=" + locations[i].text + "'>  https://h4ck.org.cn/?s=" + locations[i].text + "</a>";
var mark = locations[i].mark;
var marker_image = "https://h4ck.org.cn/avatar/avatar_circle-256.png";
if (location.is_passed ){
    marker_image = "https://h4ck.org.cn/avatar/avatar-2.png";
}

截图:


后台首页:


添加地点:


(如果不带gps坐标或者坐标无效,将会通过百度地图api解析gps坐标)

列表:


首页:


扩展内容 nginx反代:

server
    {
        listen 443 ssl http2;
        #listen [::]:443 ssl http2;
        server_name footprint.h4ck.org.cn ;
        index index.html index.htm index.php default.html default.htm default.php;
        root  /home/wwwroot/footprint.h4ck.org.cn;

        ssl_certificate /home/lighthouse/footprint.h4ck.org.cn_nginx/footprint.h4ck.org.cn_bundle.pem;
        ssl_certificate_key /home/lighthouse/footprint.h4ck.org.cn_nginx/footprint.h4ck.org.cn.key;
        ssl_session_timeout 5m;
        ssl_protocols TLSv1 TLSv1.1 TLSv1.2 TLSv1.3;
        ssl_prefer_server_ciphers on;
        ssl_ciphers "TLS13-AES-256-GCM-SHA384:TLS13-CHACHA20-POLY1305-SHA256:TLS13-AES-128-GCM-SHA256:TLS13-AES-128-CCM-8-SHA256:TLS13-AES-128-CCM-SHA256:EECDH+CHACHA20:EECDH+CHACHA20-draft:EECDH+AES128:RSA+AES128:EECDH+AES256:RSA+AES256:EECDH+3DES:RSA+3DES:!MD5";
        ssl_session_cache builtin:1000 shared:SSL:10m;
        # openssl dhparam -out /usr/local/nginx/conf/ssl/dhparam.pem 2048
        ssl_dhparam /usr/local/nginx/conf/ssl/dhparam.pem;

        include rewrite/none.conf;
        #error_page   404   /404.html;

        # Deny access to PHP files in specific directory
        #location ~ /(wp-content|uploads|wp-includes|images)/.*\.php$ { deny all; }
location /static/ {
       alias    /home/wwwroot/babyfootprint/static/;
}

location / {
        proxy_set_header X-Real-IP $remote_addr;
        proxy_set_header X-Forwarded-For $proxy_add_x_forwarded_for;
        proxy_set_header Host $host;

        proxy_pass http://127.0.0.1:10099;
        proxy_http_version 1.1;
proxy_set_header Accept-Encoding "";
}
        access_log  /home/wwwlogs/footprint.h4ck.org.cn.log;
    }

11.19 更新内容:

增加文章链接,打卡图片链接:

新效果图:

预览地址:

https://footprint.h4ck.org.cn

代码地址:

https://github.com/obaby/BabyFootprintV2

  •  

创建一个我的足迹地图

2024年11月16日 17:41

关于我页面,有个个人足迹的图片。

这个图片最早是通过google maps的足迹地图来生成的。

谷歌地图

然而,好景不常,这个东西现在也下架了,今年又去了很多地方,但是这个图片要更新就变得非常麻烦,总不能用ps往上打点吧?这也有点太智障了。于是想着通过地图来实现这个功能,高德或者百度,上午试了一下高德,发现免费的静态地图,最多只能添加10个marker,这尼玛是出来恶心姐姐我的吗?就离谱。

下午看了下百度的要好很多,于是下午折腾了一下,把足迹点,通过代码拼成url直接添加图片就能显示了,这个还是不错的,最终效果如下:

我的足迹

其中粉色点点是最起码呆过一段时间的,黄色的点点是途径点。

处理的代码也比较简单,不过最开始用的高德,于是gps坐标获取用的高德的api,需要提供高德的key。

静态地图用的百度的,所以又需要百度地图的ak,这个ak必须用服务端的ak哈。全部代码如下,没做配置功能,需要的自己改改代码就行了(运行前 pip install requests 依赖库):

import time

import requests


def amap_geodecode(addr):
    try:
        para = {
            'key': '高德的key',  # 高德地图开放平台申请的key
            'address': addr  # 传入地址参数
        }
        url = 'https://restapi.amap.com/v3/geocode/geo?'  # 高德地图API接口
        req = requests.get(url, para)
        req = req.json()
        print('-' * 30)
        print(req)
        m = req['geocodes'][0]['location']
        print(addr)
        print(m)
    except:
        return None
    return m


# 按装订区域中的绿色按钮以运行脚本。
if __name__ == '__main__':
    url_bast = 'https://api.map.baidu.com/staticimage/v2?ak=<百度的ak>&width=900&height=800&zoom=5&center=103.8319522831,36.0615585627&markerStyles=0xFF0000|0x808000&markers='
    city_list = ['北京','上海','深圳', '东营','连云港','锡林郭勒盟','赤峰','承德','济南','泰安','枣庄','昆明','长沙','湘潭','株洲','日照','威海','烟台','深圳','广州','西安','临沂','潍坊','青岛','大理','清迈','海口','三亚','蜈支洲岛','清莱']
    pass_city_list = ['天津','德州','景德镇','衢州','佛山','无锡']

    print('添加点亮城市:')
    cord_list = []
    visited_marker_style_list = []
    for c in city_list:
        m = amap_geodecode(c)
        if m:
            v = '' + m
            cord_list.append(v)
            visited_marker_style_list.append('m,V,0xFF69B4')
        time.sleep(2)
    print('添加途径城市:')
    for c in pass_city_list:
        m = amap_geodecode(c)
        if m:
            v = '' + m
            cord_list.append(v)
            visited_marker_style_list.append('s,P,0xFFFF00')
        time.sleep(2)

    print(cord_list)
    print('|'.join(cord_list))
    print('最终url:')
    print(url_bast + '&markerStyles=' + '|'.join(visited_marker_style_list) + '&markers=' + '|'.join(cord_list))

别问为啥这么搞,问就是懒得改了,哈哈哈。添加图片直接使用最后的url即可。以后足迹点多了之后,修改list重新生成url即可。

唯一的缺点,不支持国外的坐标,我的泰国的坐标标不上,不过也无所谓了,反正就一个泰国而已。

更多定制化功能,参考百度地图的相关开发文档:

https://lbsyun.baidu.com/faq/api?title=static/prepare

https://lbsyun.baidu.com/faq/api?title=static/markerStatic

https://lbsyun.baidu.com/faq/api?title=static/heightStatic

  •  

Amazon CloudFront 免费 CDN 配置教程

2024年11月10日 19:40

三十海河 留言文能不能出个教程,下午看了下正好之前给宝子做的博客挂掉了。正好迁移过来,不过不得不说,这个体验的确比较奇怪,cname解析,有的域名能加,有的不能加,这就很离谱。

视频分两段录的,主要是第一段失败了,但是实在不想重新录了。直接看这两段吧。第一段有些问题,第二段也提到了。

整体用起来的感觉就是,很多翻译有些奇怪,包括文档看的也莫名其妙,这个就很蛋疼。

不过好在最后还是成功了,折腾半天,哼唧唧

  •  

Amazon CloudFront 免费 CDN 初体验

2024年11月10日 08:58

前几天在呆哥的博客看到了为网站添加cloudfront的文章,于是昨天把一个没套cdn的域名尝试给加上了cdn。

具体添加的步骤按照呆哥的文章操作就可以啦,然而,在添加完cdn之后,却一直出现问题,报502错误。

按照之前的配置方式,直接添加的http的回源,很可能是这个回源问题,尝试添加http回源,发现http是能访问的。但是https的不行,猜测可能是aws的回源校验证书了,本地服务器用的都是同一个证书(h4ck.org.cn),如果校验证书有效性,那肯定是无法创建链接的。重新申请免费证书之后,这个问题算是解决了。

然而还有另外一个诡异的问题,那就是https://www.obaby.org.cn可以访问,但是https://obaby.org.cn无法访问,报403错误。参考官方的文档,提示是cname问题,域名是dnspod解析的直接给@添加的cname记录。不过这个做法按照dns的国际做法其实是不受支持的,不能直接给@添加cname解析的。只好将域名解析切换到he.net重新创建alias解析。

然而问题依旧,猜测还是配置问题。后来才发现这个东西的异常之处,按照理解添加域名之后,不在需要添加额外的cname了。

然而事实上却是,这个东西不管添加的的时候创建的域名是什么,在这里都需要把添加的时候的域名加进去才能正常匹配到这个cname。

另外一个就是这个源里面的,源域的问题,最外侧的这个名称其实无关紧要。

需要设置的是内部的original domain:

这个对应的才是回源的配置。经过上面的设置之后,终于两个域名都能用了,并且,顺便把ipv6也给开启了。

测速效果,V4:

v6速度:

后台地址:

https://console.aws.amazon.com

  •  

100行代码实现 favicon 小工具

2024年9月24日 10:32

这几天查看统计的时候发现统计页面的小图标不显示了。

图标变成了一个白色方框,这个umami 一直无法加载 favicon,之前换成了:https://favicon.cccyun.cc/h4ck.org.cn

现在这个服务貌似证书过期了,也没人维护,看来也没多少人用啊:

本着能动手尽量别 bb 的理念,既然不能用了那就自建服务吧。

个人觉得最简单的代码还是通过 python 实现,依赖于 flask + favicon 库,只需要一百行代码就 ok 了。实现方式,通过 favicon 库获取图标,将图标数据缓存到 redis,再次请求直接返回 redis 缓存数据。完整代码如下:

import json

from flask import Flask, request, redirect, jsonify
import favicon
import redis
import json
from urllib.parse import urlparse

app = Flask(__name__)

rds = redis.Redis(host='localhost', port=6379, db=1)


def get_domain_from_url(url):
    parsed_uri = urlparse(url)
    return 'https://{uri.netloc}'.format(uri=parsed_uri)


def get_query_count():
    key = 'QUERY_COUNT'
    count = 1
    if rds.exists(key):
        count = int(rds.get(key))
    return count


def set_query_count():
    key = 'QUERY_COUNT'
    count = 1
    if rds.exists(key):
        count = int(rds.get(key))
        count += 1
    rds.set(key, count)
    return count


def get_icon_list_from_rds(key):
    if rds.exists(key):
        # print('cached')
        cashed = rds.get(key)
        js = json.loads(cashed)
        return js
    icons = favicon.get(key)
    # rds.set('url',icons,)
    icon_list = []
    for i in icons:
        data = {
            'url': i.url,
            'width': i.width,
            'height': i.height,
            'format': i.format
        }
        icon_list.append(data)
    js_str = json.dumps(icon_list)
    rds.setex(key, 86400, js_str)
    return icon_list


@app.route('/')
def hello_world():  # put application's code here

    return ('--------------------------- <br> '
            'Query count:' + str(get_query_count()) + '<br>'
                                                      '=========================== <br> '
                                                      'Baby Favicon Tool v1.0  \r\n<br> by:obaby \r\n <br><a href="https://oba.by" target="_blank">https://oba.by</a> <br>\r\r '
                                                      '<a href="https://h4ck.org.cn" target="_blank">https://h4ck.org.cn</a>')


# http://127.0.0.1:5000/api/get_favicon?url=https://h4ck.org.cn
@app.route('/api/get_favicon')
def search():
    query = request.args.get('url')
    if '.' not in query:
        return 'invalid url'
    if not query.startswith('http'):
        query = 'http://' + query

    icons = get_icon_list_from_rds(query)
    set_query_count()
    # icons_str = json.dumps(icons)
    return jsonify(icons)


@app.route('/api/redirect_favicon')
def redirect_icon():
    query = request.args.get('url')
    if '.' not in query:
        return 'invalid url'
    if not query.startswith('http'):
        query = 'http://' + query
    set_query_count()
    icons = get_icon_list_from_rds(query)
    try:
        icon_url = icons[0]['url']
    except:
        icon_url = 'https://h4ck.org.cn/wp-content/uploads/2024/09/favicon.png'
    return redirect(icon_url, code=302)


if __name__ == '__main__':
    app.run()

到这里这个服务就算完成了,后续就是通过 nginx 反代了,经常反代的朋友都回了,我就不写了。

修改 umami 源代码:vim umami/src/components/common/Favicon.tsx

修改划线部分为上述内容,重新编译即可,编译过程中很可能会卡在 build-geo.修改 build 脚本 vim scripts/build-geo.js

这个破玩意儿 bug 之处在于,如果使用 github 代理,下载过程会出错,第二部分的实时解压就挂了,这个逻辑也是 tm 神了,不能下载完再解压吗?

直接下载第一处gz 文件解压,将 GeoLite2-City.mmdb放入geo 目录下,注释掉第二部分执行 yarn build 即可。不得不多,这 dq 真是给程序员创建了无数的便利,就尼玛离谱。重新启动服务一切就 ok 了。

图标又回来了,现有服务地址: https://favicon.h4ck.org.cn (不保证服务可用性,有时候的确是懒不想折腾了,之前的 gravatar 忽然因为 cdn 问题就失效了,结果删除重建也不行就放弃了。这个实属无奈,但是基本都会保证一个可用的服务。)

使用方法:

接口:  
1. 获取 favicon 数据,返回 json 格式  
http://127.0.0.1:5000/api/get_favicon?url=oba.by  
返回数据内容:  
```json
[
  {
    "format": "png",
    "height": 300,
    "url": "https://oba.by/wp-content/uploads/2020/09/icon-500-300x300.png",
    "width": 300
  },
  {
    "format": "png",
    "height": 200,
    "url": "https://oba.by/wp-content/uploads/2020/09/icon-500-200x200.png",
    "width": 200
  },
  {
    "format": "png",
    "height": 192,
    "url": "https://oba.by/wp-content/uploads/2020/09/icon-500-200x200.png",
    "width": 192
  },
  {
    "format": "png",
    "height": 32,
    "url": "https://oba.by/wp-content/uploads/2020/09/icon-500-100x100.png",
    "width": 32
  },
  {
    "format": "ico",
    "height": 0,
    "url": "https://oba.by/favicon.ico",
    "width": 0
  },
  {
    "format": "jpg",
    "height": 0,
    "url": "https://h4ck.org.cn/screenshots/obaby_tuya.jpg",
    "width": 0
  }
]
```
2. 直接返回 favicon 链接  
http://127.0.0.1:5000/api/redirect_favicon?url=oba.by  
返回数据内容为上述接口的第一个结果,例如上面的 域名将会直接 302跳转到 https://oba.by/wp-content/uploads/2020/09/icon-500-300x300.png  
如果没有 favicon 将会返回默认连接:https://h4ck.org.cn/wp-content/uploads/2024/09/favicon.png

代码地址:

https://github.com/obaby/baby-favicon-tool.git

  •  
❌